Multi-Monitor Mac Setup: The Complete 2026 Guide
Set up 2, 3, or 4 monitors on any MacBook Pro, Air, or desktop Mac. Compatibility by chip, the right cables and docks, and how to manage them.
A second monitor is the cheapest, fastest upgrade most Mac users can make to their workspace. A third one changes how you work. The hard part is not deciding you want them. It is figuring out whether your Mac can actually drive them, picking the right cable or dock for your specific chip, and then living with the fact that macOS treats every connected display as its own little island.
This guide is the one you read before you buy anything. It covers which Macs support how many external monitors (the answer depends on the exact chip), how to connect them on MacBook Pro and MacBook Air, which docks and adapters are worth the money, how to push beyond two displays, and how to manage them once they are running.
Which Macs Support Multiple External Monitors?
The number of external displays your Mac can drive is decided by the chip inside, not by the ports on the outside or the dock you plug into. No cable trick changes the limit. The one exception is DisplayLink, a software-based workaround we cover further down, which can add displays beyond the native cap on most Macs.
This is the current support matrix as of May 2026.
MacBook Air
| Chip | Max External Displays | Notes |
|---|---|---|
| M1 | 1 | DisplayLink required for 2+. |
| M2 | 1 | DisplayLink required for 2+. |
| M3 | 2 | Second display requires clamshell mode (lid closed). macOS Sonoma 14.3 or later. |
| M4 | 2 | Both displays work with the lid open. |
| M5 | 2 | Both displays work with the lid open. |
MacBook Pro
| Chip | Max External Displays | Notes |
|---|---|---|
| M1 / M2 (base) | 1 | DisplayLink required for 2+. |
| M1 / M2 Pro | 2 | Native dual display. |
| M1 / M2 Max | 4 | |
| M3 (base) | 2 | Second display requires clamshell mode. macOS Sonoma 14.6 or later. |
| M3 Pro | 2 | Native dual display. |
| M3 Max | 4 | |
| M4 | 2 | Native dual display. |
| M4 Pro | 2 | |
| M4 Max | 4 | |
| M5 | 2 | Native dual display. |
| M5 Pro | 3 | |
| M5 Max | 4 |
Desktop Macs
| Model | Max External Displays |
|---|---|
| Mac mini (M4 / M4 Pro) | 3 |
| Mac Studio (M4 Max) | 5 |
| Mac Pro (2023) | 8 |
| iMac (M4, four-port) | 2 |
| iMac (M4, two-port) | 1 |
Key takeaway. If you have a base M1 or M2 MacBook, you are stuck at one external display natively. M3 base chips can drive two, but only with the lid closed. M4 and M5 base chips finally deliver lid-open dual-monitor support. For three or more displays without DisplayLink, you need a Pro or Max chip or a desktop Mac.
Resolution limits. A single display can run at 8K 60Hz or 4K 240Hz on M4 and M5 chips. When you connect two, each one typically maxes out at 6K 60Hz or 4K 144Hz. Apple's display support page lists the exact ceilings per model.
Which Multi-Monitor Setup Method Should You Use?
Five approaches cover almost every Mac multi-monitor setup. The right one depends on your chip, how many displays you need, and whether you also want to control them once they are running.
| Method | Best For | The Catch |
|---|---|---|
| Native (direct connect) | Pro / Max chips, or any M4 / M5 base chip. Best performance, no extra software. | Capped at your chip's native display limit. |
| DisplayLink dock | Going beyond the chip's cap (base M1 / M2 Macs, or a third display on any Air). | Lag on fast video, blocks DRM streaming (Netflix, Apple TV+), needs a background app running. |
| Clamshell mode | A second display on a base M3 MacBook. | Lid must stay closed; a fanless Air throttles under sustained load. |
| iPad + Sidecar | A free wireless extra display you already own. | Smaller and lower refresh rate than a real monitor; not a primary-display replacement. |
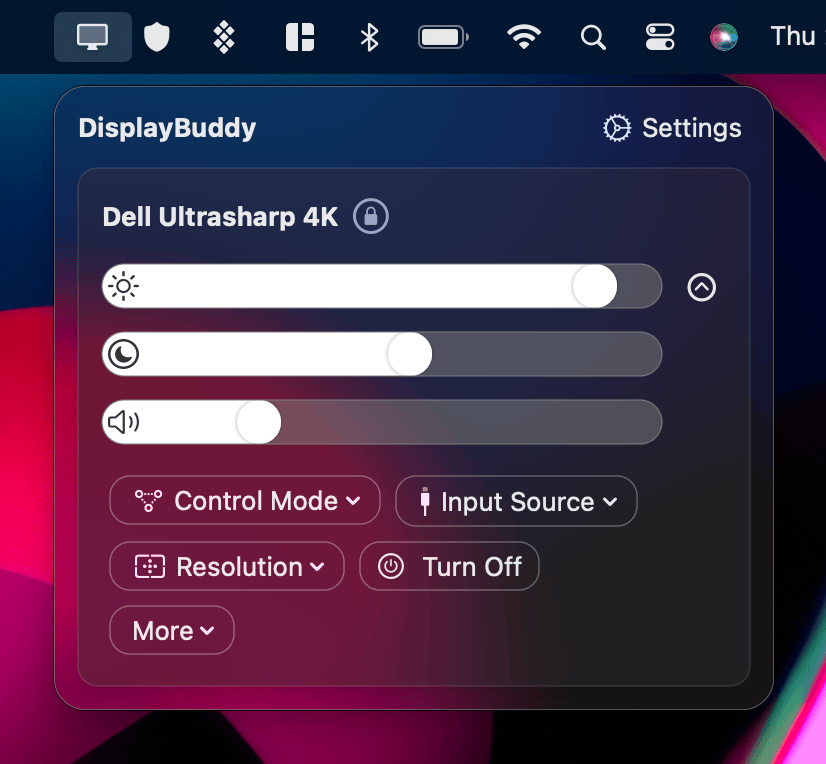
| Managing them all (DisplayBuddy) | Brightness, contrast, volume, and presets synced across every connected monitor. | A paid app (7-day free trial); a control layer, not a connection method. |
Connection method and management are separate decisions. The first four rows get the screens running; the last row is how you control them afterward, which is the half macOS leaves out and the focus of the later sections.
How to Set Up Dual Monitors on MacBook Pro
If your MacBook Pro is a Pro or Max chip (M1 Pro and later), or an M3 base chip in clamshell mode, or any M4 / M5, dual monitors work without third-party software.
Step 1: Check Your Ports
Pro and Max MacBook Pros have three Thunderbolt 4 / USB 4 ports and one HDMI port. Base-chip MacBook Pros (M3, M4) typically have two or three USB-C / Thunderbolt ports plus one HDMI. The HDMI port is fine for one monitor. The USB-C / Thunderbolt ports handle the rest.
To confirm your chip, open Apple menu > System Settings > General > About.
Step 2: Connect Your Cables
Plug each monitor directly into a separate port on the MacBook Pro. Use Thunderbolt or USB-C where the monitor supports it. HDMI is fine for the second display.
If your monitor only has HDMI or DisplayPort input, use a USB-C to HDMI or USB-C to DisplayPort adapter. Thunderbolt cables are not required for most setups, but they carry the most bandwidth, which matters for 4K-at-144Hz or 5K-at-60Hz panels.
Step 3: Configure in System Settings
Go to Apple menu > System Settings > Displays. Every connected display appears in the sidebar. Click Arrange to drag the displays into the order that matches your physical desk.
By default, macOS extends your desktop across all connected screens. If one display is mirroring instead, click that display in the sidebar and switch "Use As" from "Mirror" to "Extended Display."
Step 4: Set Resolution and Refresh Rate
Click each display in System Settings and choose its resolution. "Default for display" is correct for most monitors. If text looks soft on a non-Retina display, pick "Scaled" and try a lower resolution. For 120Hz, 144Hz, or higher-refresh panels, select the higher refresh rate from the dropdown. Your maximum refresh rate depends on the combination of port, cable version, and resolution.
Troubleshooting
If a monitor is not detected, plug it directly into the MacBook (not through a hub). Many USB-C hubs only pass through a single display signal on Apple Silicon. Unplug and replug the cable. Make sure macOS is on the latest point release.
For brand-specific quirks see our guides for Dell monitors, LG monitors, Samsung monitors, BenQ monitors, and ASUS monitors.
How to Set Up Dual Monitors on MacBook Air
The MacBook Air is where Apple Silicon's display limits hurt the most. The process is different for each chip generation.
M4 and M5 MacBook Air: Native Dual Display
On M4 and M5 MacBook Air, dual monitors work with the lid open. Connect each monitor to one of the two USB-C / Thunderbolt ports. Use a USB-C to HDMI cable or a direct USB-C / Thunderbolt cable if the monitor supports it.
Go to System Settings > Displays to arrange the two screens. Each can run at up to 6K 60Hz or 4K 144Hz.
M3 MacBook Air: Clamshell Mode Required
The M3 MacBook Air can drive two external displays, but only with the lid closed. The setup order matters:
- Connect an external keyboard and mouse (Bluetooth or USB).
- Connect the MacBook to power over USB-C or MagSafe.
- Plug in the first monitor.
- Close the lid.
- Plug in the second monitor.
macOS Sonoma 14.3 or later is required. The first display supports up to 6K 60Hz, the second up to 5K 60Hz.
Heads up. Opening the lid drops the second display. macOS may also forget your arrangement, so you reorder the monitors in System Settings the next time you connect.
M1 and M2 MacBook Air: DisplayLink Required
The base M1 and M2 MacBook Air support exactly one external display natively. This is the chip's limit, not a software bug, and no plain HDMI or USB-C adapter changes it.
The workaround is a DisplayLink dock or adapter. DisplayLink compresses the second monitor's video in software and pipes it over USB, sidestepping the GPU's display cap. It works for most everyday use, with three caveats:
- The DisplayLink Manager app has to be running.
- Fast-moving content (game frames, video scrubbing) can show lag or stutter.
- DRM-protected video (Netflix, Apple TV+, Disney+) may refuse to play on a DisplayLink screen.
For static work (documents, code, email, web), DisplayLink is fine. For video editing, gaming, or watching streaming services on the second monitor, the experience is rough enough that Reddit threads consistently recommend upgrading to an M4 or M5 Air instead.
Choosing the Right Dock, Adapter, or Cable
The hardware decision depends on two things: how many monitors your Mac can drive natively, and whether you want one cable to the laptop or several.
When You Can Go Direct (No Dock Needed)
If your Mac natively supports the number of monitors you want, plugging each monitor straight into a separate port gives you the best performance and the fewest variables. Three options cover almost every setup:
- USB-C to HDMI adapter (one per monitor). The simplest path. Works with any HDMI monitor.
- USB-C to DisplayPort cable. Better for 144Hz or higher refresh-rate panels.
- Thunderbolt cable. Required for Thunderbolt monitors (Apple Studio Display, LG UltraFine 5K). Carries power, data, and video on one cable.
When You Need a Thunderbolt Dock
A Thunderbolt dock is useful if you want one cable from the laptop that handles two monitors, USB peripherals, Ethernet, and charging at once. It does not add display outputs beyond your Mac's native cap. It just consolidates cables.
Good fit for: M4 or M5 MacBook Pro / Air with two natively supported displays, where the goal is cable management. Look at the OWC Thunderbolt 5 Dock, the CalDigit TS5 Plus, or the Plugable TBT4-UDZ.
When You Need a DisplayLink Dock
A DisplayLink dock is the only way to add display outputs beyond your Mac's native cap. The chip thinks it is sending the extra signal over USB; the dock decodes it and feeds the monitor.
Required for: base M1 or M2 MacBook Air or Pro that needs two monitors, or any MacBook Air that needs three. Look for docks that explicitly list DisplayLink in their spec, like the Plugable UD-7400PD or the Anker 778 Thunderbolt Docking Station (which combines native Thunderbolt and DisplayLink outputs).
What to Avoid
Generic "USB-C to dual HDMI" adapters that claim to drive two monitors on a Mac usually mirror the same image on both screens. The same dongle works correctly on Windows because Windows supports MST (Multi-Stream Transport). macOS does not. If a product page lists dual-monitor extended-mode support only under Windows, it will not extend on a Mac.
Two displays daisy-chained through a single USB-C cable also does not work on any MacBook. Each display needs its own physical port on the laptop or its own DisplayLink output on the dock.
Whichever dock you end up with, getting the monitors physically connected is only half the multi-monitor problem on a Mac. The other half is controlling them once they are running, which is where macOS falls short and where DisplayBuddy picks up. For brand-specific connection quirks, see the Samsung Smart Monitor setup guide.
Going Beyond Two: Triple and Quad Monitor Setups
If two monitors are not enough, the options open up at the Pro and Max chip tiers, and there are three viable paths to a triple-display rig.
Path 1: Native Triple (or More) on a Pro / Max Mac
The cleanest setup. MacBook Pro M5 Pro drives three native displays, and any Max chip (M3 Max, M4 Max, M5 Max) drives four. The Mac mini M4 Pro supports three; the Mac Studio (M4 Max) supports five; the Mac Pro (2023) supports eight.
Connect each monitor to its own port. No DisplayLink, no special drivers, no compromises on refresh rate or DRM playback.
Path 2: DisplayLink for the Third Display
On a base MacBook Air or MacBook Pro, the only way to add a third monitor is DisplayLink. The best results come from a hybrid setup: connect the first two monitors over native HDMI or USB-C ports, and use DisplayLink only for the third display.
Put the static content on the DisplayLink screen (chat, email, reference docs, terminal logs). Keep video, gaming, and creative apps on the natively-connected monitors, where there is no lag or DRM limitation.
Path 3: iPad + Sidecar as an Extra Display
An iPad you already own becomes a wireless third monitor through Sidecar. It will not match a dedicated external panel for size or refresh rate, but it costs nothing and works at the desk or on the road. Open System Settings > Displays > Add Display and pick the iPad.
For ergonomics across three or more monitors (height, angle, viewing distance), see our monitor ergonomics guide.
Why macOS Makes Multi-Monitor Hard: The Software Gap
Getting the screens connected is the easy half. Once two or three displays are running, macOS gives you almost nothing to manage them with. Three specific gaps show up repeatedly on Apple Support threads, MacRumors, and r/macsetups.
Brightness Keys Only Work on the Built-in Display
Press the brightness keys on a MacBook and only the laptop screen changes. The external monitors keep whatever brightness their physical buttons last set them to. If you want to dim a Dell and an LG together, you walk around the desk and press the buttons on each one.
This is the single most-cited frustration in Apple Support threads about external displays. There is no setting to turn it on; macOS does not expose brightness control for most external monitors at all. The workaround is a third-party DDC/CI (Display Data Channel/Command Interface) app. See our overview of Mac brightness control options for the full landscape.
No Way to Save Display Profiles
macOS does not save display configurations. If you use one setup at the office, a different one at home, and a single portable monitor when you travel, you reconfigure resolution, brightness, contrast, and arrangement every time you change setups. macOS remembers some of the arrangement; almost nothing else.
Each Monitor Is an Island
Adjusting brightness on one external monitor does nothing to the others. Two panels almost never have the same brightness curve. Matching them visually means tuning each one separately, and re-tuning them as the light in the room changes through the day.
Clamshell Mode Is Not Free
On M3 base chips, clamshell mode is the price you pay for a second display. The trade-offs that show up most often in real setups:
- Heat builds up under sustained load. The MacBook Air is fanless, so the chassis (including the keyboard area) is the cooling surface. Closing the lid removes a meaningful chunk of that surface. Benchmarking by the YouTube channel Max Tech, reported by Macworld, showed the M3 MacBook Air losing about 50% of its performance in clamshell after 20 minutes of a 3DMark Wild Life Extreme stress test, with throttling starting around the six-minute mark. MacBook Pro models have a fan and handle clamshell much better. Typical productivity loads (browser, code editor, video calls) usually don't hit throttling on either; heavy sustained loads (3D rendering, long video exports, large Lightroom imports) do, especially on the Air.
- Wake from sleep is less reliable. Tapping an external Bluetooth keyboard works most of the time, but not always. Touch ID is unavailable until you open the lid.
- Opening the lid drops the second display. Any reason to lift it (Touch ID, camera, fingerprint unlock) drops the M3's second display and may scramble the arrangement.
A handful of third-party apps fill parts of this gap. MonitorControl, Lunar, and BetterDisplay each handle some pieces. DisplayBuddy handles all of them in one app, on Mac and Windows.
How DisplayBuddy Fixes the Multi-Monitor Gap
The easiest way to manage two or more external monitors on a Mac is DisplayBuddy. It is a Mac and Windows app built specifically for multi-monitor workflows, and it turns each of the three pain points above into a single action.
Sync: One Adjustment, Every Display
Turn on Sync and changing the brightness on one monitor changes them all. Use the app, use a keyboard shortcut, or ask Siri. When the room gets darker at 5 PM and you would normally walk around the desk pressing buttons, one keystroke does the whole rig.
Sync handles brightness, contrast, and volume. Mixed brands work fine: a Dell and an LG and a Samsung end up at the same perceived brightness once the offset for each is set.
Presets: Save Your Entire Display Setup
Presets save the brightness, contrast, volume, and input source for every connected monitor as a single named profile. Build a "Day" preset for bright office light, a "Night" preset for dim evenings, a "Movie" preset for a darker viewing setup. Switch between them with a keyboard shortcut, a menu bar click, or a Siri command.
If you move between a home desk, an office, and a travel monitor, each setup gets its own preset. Plug in your monitors, hit the shortcut, you are configured. No manual adjustment.
Schedules: Adjust Without Touching Anything
Schedules trigger presets automatically. Run the "Day" preset at 9 AM, the "Evening" preset at 6 PM, and the "Night" preset at 10 PM. Or trigger them on system events: when the lid closes, when the Mac goes on battery, when an external display is connected.
Keyboard Shortcuts, Spotlight, Siri, and Shortcuts
DisplayBuddy extends the Mac's brightness and volume keys to every external monitor. F1 and F2 dim and brighten the whole row of displays using DDC/CI. The same keys also drive presets and Sync.
Spotlight and Siri work too. "Hey Siri, switch to Night preset." Apple Shortcuts can wire DisplayBuddy actions into longer routines (start work, end work, focus mode).
Works on Mac and Windows
If you use both platforms, DisplayBuddy runs on both with one license. Sync is identical on both. Presets on Windows cover brightness, contrast, and volume; input source and display layout are Mac-only at the moment. The Windows download includes a 7-day free trial. See the Windows page for details.
Browse all guides for more setup walkthroughs, or visit pricing for plan options.
Frequently Asked Questions
Mac Compatibility and Setup
Does MacBook Pro support dual monitors?
It depends on the chip. MacBook Pro with M1 Pro, M2 Pro, M3 Pro, M4, M4 Pro, M5, or M5 Pro (and any Max variant) supports two or more external displays natively. The base M1 and M2 MacBook Pro support one external display only. The base M3 MacBook Pro supports two, but only in clamshell mode with the lid closed and macOS Sonoma 14.6 or later. To check your chip: Apple menu > System Settings > General > About.
How do I set up dual monitors with my MacBook Pro?
Plug each monitor directly into its own port on the MacBook Pro. Use the HDMI port for one, a USB-C or Thunderbolt port for the other. Open Apple menu > System Settings > Displays, click Arrange, and drag the display icons to match the physical position of the monitors on your desk. Switch any display that is mirroring to "Extended Display" instead. Set each display's resolution and refresh rate from the same panel.
How do I connect two monitors to my MacBook Air?
If you have an M4 or M5 MacBook Air, plug each monitor into one of the two USB-C ports and use System Settings > Displays to arrange them. If you have an M3 MacBook Air, you need clamshell mode: connect an external keyboard, mouse, and power, plug in the first monitor, close the lid, then plug in the second monitor. macOS Sonoma 14.3 or later is required. If you have an M1 or M2 MacBook Air, a DisplayLink dock or adapter is required for the second display.
Docks, Adapters, and DisplayLink
What is the best dock for a MacBook with dual monitors?
The right dock depends on which chip your Mac has. For an M4 or M5 MacBook Pro / Air that already supports two displays natively, a Thunderbolt dock (CalDigit TS5 Plus, OWC Thunderbolt 5 Dock, Plugable TBT4-UDZ) consolidates cables without adding display outputs. For a base M1 or M2 MacBook that supports only one display natively, you need a DisplayLink dock that adds an extra output (Plugable UD-7400PD, Anker 778). A Thunderbolt dock alone will not give you two monitors on a base chip.
Can I run a triple monitor setup on a Mac with DisplayLink?
Yes, on any MacBook Air or base MacBook Pro that supports at least one native display. The recommended setup is hybrid: connect the first two monitors to native ports (HDMI and USB-C / Thunderbolt) and use DisplayLink only for the third. Put static content (chat, email, terminal) on the DisplayLink screen, since it can show lag with fast-moving video and may block DRM-protected playback like Netflix or Apple TV+.
What is DisplayLink and when do I need it?
DisplayLink compresses video in software and sends it over USB, bypassing the Mac chip's native display output limit. You need it when you want more external monitors than your chip supports natively (two monitors on a base M1 Air, three monitors on an M4 Air). It requires the DisplayLink Manager app running in the background. The trade-offs: it can lag with fast video or games, and DRM-protected streaming services may refuse to play on a DisplayLink screen.
Managing Multiple Monitors
How do I control brightness on multiple external monitors?
macOS does not natively support keyboard brightness control for external monitors. The fix is a third-party DDC/CI app. DisplayBuddy controls brightness, contrast, and volume on any DDC/CI-compatible external monitor using keyboard shortcuts. Turn on Sync and one adjustment changes every connected display together. Other options include MonitorControl (free, basic), Lunar (ambient light modes), and BetterDisplay (virtual displays, power-user features).
Can I save display settings as presets on Mac?
macOS has no built-in way to save and restore display profiles. DisplayBuddy Presets save brightness, contrast, volume, and input source for every connected monitor as one named profile. You switch between presets from a keyboard shortcut, the menu bar, or Siri. Useful if you move between home and office setups, or want a "Day" / "Night" pair that you cycle through.
Configuration and Troubleshooting
How do I extend my display instead of mirroring on Mac?
Open Apple menu > System Settings > Displays. Click the external display in the sidebar, find the "Use As" setting, and change it from "Mirror" to "Extended Display." Click Arrange to drag the displays into the order they sit on your desk. The white bar at the top of one display marks the primary display where the menu bar lives; you can drag it to whichever monitor you prefer.
Does clamshell mode cause thermal throttling?
It depends on whether your Mac has a fan. MacBook Air models are fanless and rely on the aluminum chassis (keyboard area included) as a heat sink, so closing the lid removes part of that cooling surface. Benchmarking by Max Tech, reported by Macworld, measured the M3 MacBook Air losing about 50% of its performance in clamshell after 20 minutes of sustained 3DMark Wild Life Extreme, with throttling starting around six minutes in. MacBook Pro models have active cooling and show little to no throttling in the same benchmark. For typical productivity (browser, code, video calls), most users will not hit throttling on either. For heavy sustained workloads (3D rendering, long video exports, large Lightroom imports), MacBook Air in clamshell does throttle. A vertical stand with airflow around the chassis is better than a flat-bottomed riser.
DisplayBuddy
for macOS 10.13+
Take control of your monitors
Control brightness, contrast, volume, and much more.
Buy NowLifetime license • 7-day refunds no questions asked