Best Monitor Mounts for an Ergonomic Desk Setup (2026)
VESA monitor mounts for single, dual, and quad setups. Ergonomic positioning tips, common problems, and how to sync brightness across every display.
Your monitor's stock stand is the weakest link in your desk setup. It locks you into a fixed height, eats up desk space, and makes it nearly impossible to position two or more screens at the right angle. A VESA monitor mount fixes all of that for under $40.
This guide covers everything you need to set up an ergonomic monitor workspace: VESA compatibility, mount types, single and multi-monitor configurations, common problems, and the software side that every hardware guide skips.
In short: mount your monitors on adjustable arms, position them at eye level and arm's length, then use DisplayBuddy to sync brightness and save display presets across every screen.
What Is a VESA Mount (and Does Your Monitor Have One)?
VESA, short for Video Electronics Standards Association, defines a universal bolt pattern on the back of monitors. If your monitor has four threaded holes arranged in a square or rectangle on its back panel, it is VESA compatible.
Three standards cover the vast majority of monitors:
| Standard | Size | Pattern | Screw |
|---|---|---|---|
| MIS-D | 22–24" | 75×75 or 100×100 mm | M4 |
| MIS-E | 27" | 200×100 or 100×100 mm | M4 |
| MIS-F | 32"+ / TVs | 200×200 or 400×400 mm | M6 / M8 |
Most monitors sold today in the 24–32" range use the 100x100 mm pattern. Check your monitor's spec sheet or look at the back panel. If you see four holes spaced 75 mm or 100 mm apart, you are good to go.
No VESA holes? Some monitors (especially ultra-thin consumer models) skip the mounting holes. VESA adapter plates are available for around $10–20 and clamp onto the monitor's existing stand neck to provide a standard 100x100 mount point. Check that the adapter supports your monitor's weight before buying.
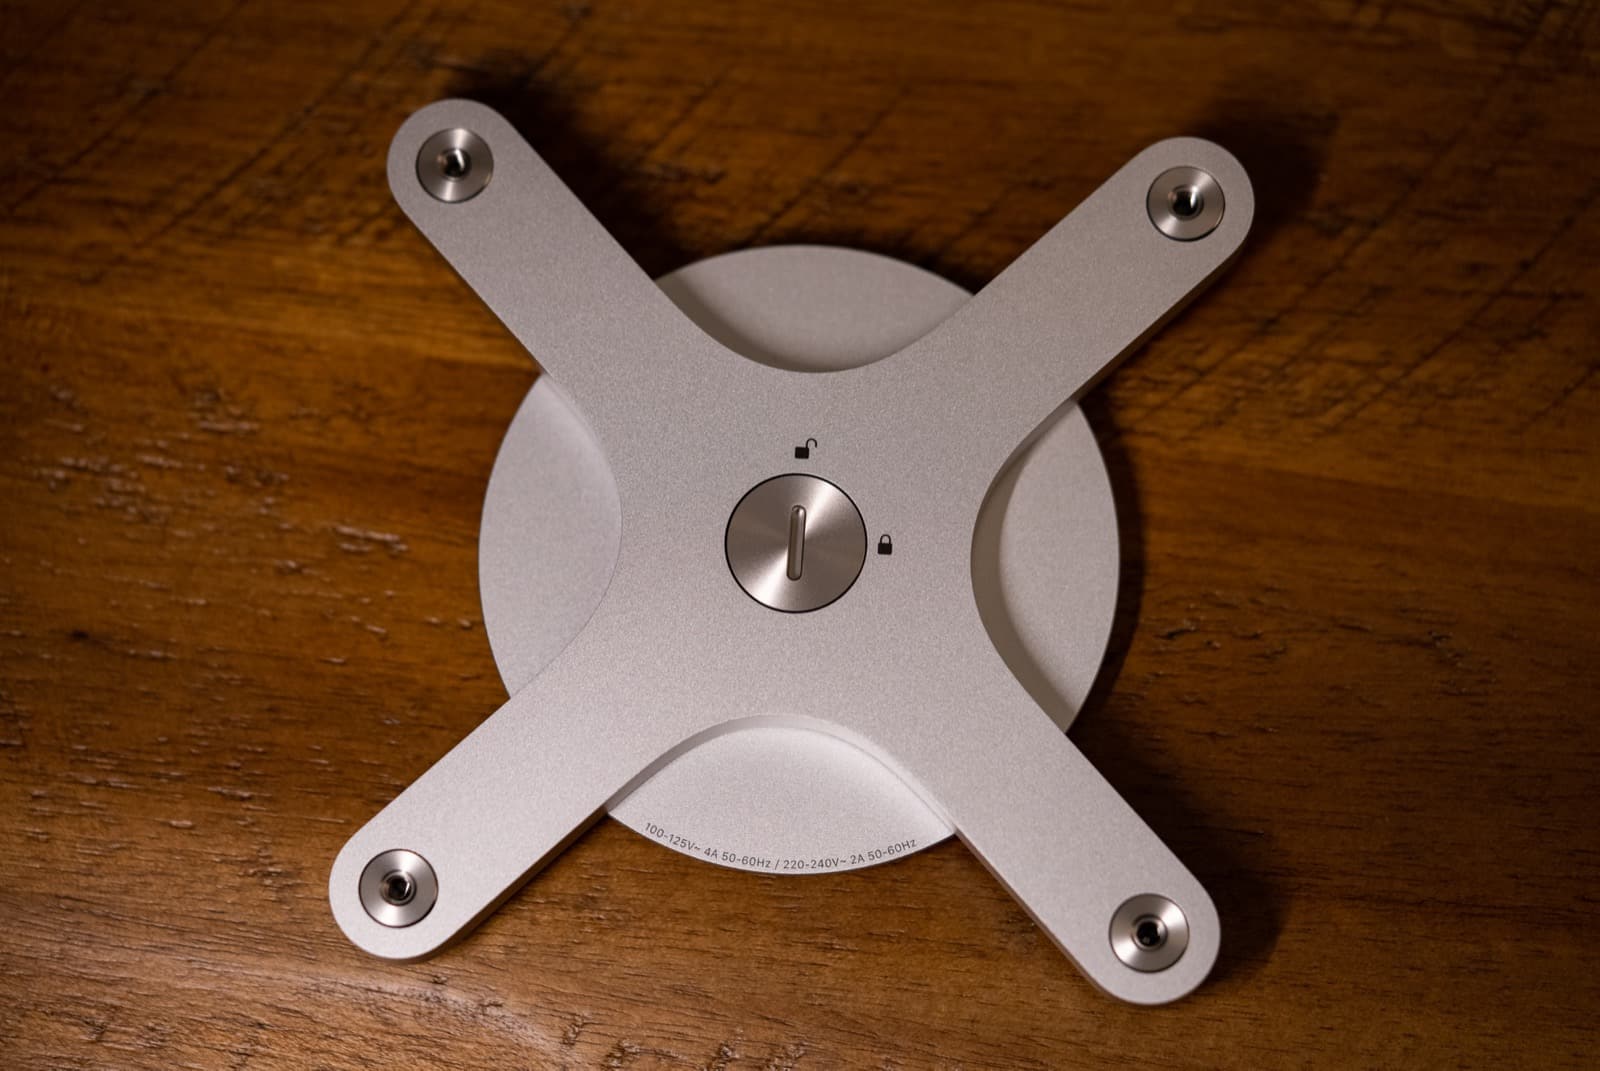
Photo: "Apple Pro Display XDR VESA Mount Adapter" by Tony Webster, licensed under CC BY 2.0. An adapter like this gives any non-VESA monitor a standard 100×100 mm mount surface.
Monitor Mount Types: Clamp, Grommet, and Freestanding
There are three main ways to attach a monitor arm to your desk. Each has trade-offs depending on your desk material, available space, and how often you reposition your screens.
| Mount Type | How It Attaches | Best For |
|---|---|---|
| Clamp | C-clamp on desk edge | Most desks; no drilling |
| Grommet | Bolt through a desk hole | Permanent setups, heavier monitors |
| Freestanding | Weighted base on desk | Glass desks, floating shelves |
Watch out for:
- Clamp mounts can indent soft wood, bamboo, or hollow-core desks. Use a metal spreader plate to distribute pressure.
- Grommet mounts require drilling a permanent hole in your desk. Not reversible.
- Freestanding mounts take up desk space and are less adjustable than arm-style mounts.
Gas Spring vs. Mechanical Spring
Within clamp and grommet mounts, you will see two arm mechanisms:
- Gas spring arms use a pressurized cylinder for smooth, tool-free height adjustment. They hold any position you set them to. This is what most people want.
- Mechanical spring arms use a tension spring and require an Allen key to adjust the tension. They are cheaper but less convenient for frequent repositioning.
For a standing desk where you change heights throughout the day, gas spring is worth the extra $10–15.
How to Set Up a Single Monitor Mount
A single arm mount is the simplest upgrade and makes the biggest difference for ergonomics. Here is how to set it up correctly.
Step 1: Attach the Mount to Your Desk
Clamp the mount base to the back edge of your desk (or install the grommet bolt through a pre-drilled hole). Position it directly behind where you want the center of your screen. Leave 4–6 inches of clearance between the desk's back edge and the wall, because the arm's hinge extends backward when you push the screen forward.
Step 2: Attach Your Monitor
Remove the stock stand from your monitor. Align the VESA plate on the arm with the holes on the back of your monitor. Secure with the included M4 screws (hand-tight, then a quarter-turn with a screwdriver). Do not overtighten.
Step 3: Set the Ergonomic Position
- Height: The top edge of your screen should be at or slightly below eye level. Your eyes should naturally rest on the upper third of the display.
- Distance: Arm's length, roughly 20–26 inches from your eyes. If you have a 27" or larger monitor, sit slightly further back.
- Tilt: Angle the screen back 10–20 degrees. This reduces glare from overhead lighting and puts the full screen surface perpendicular to your line of sight.
Step 4: Route Your Cables
Most monitor arms have built-in cable channels or clips along the arm. Thread your power, video, and USB cables through these channels before tightening. This keeps cables from snagging when you adjust the arm and gives you a clean desk appearance.
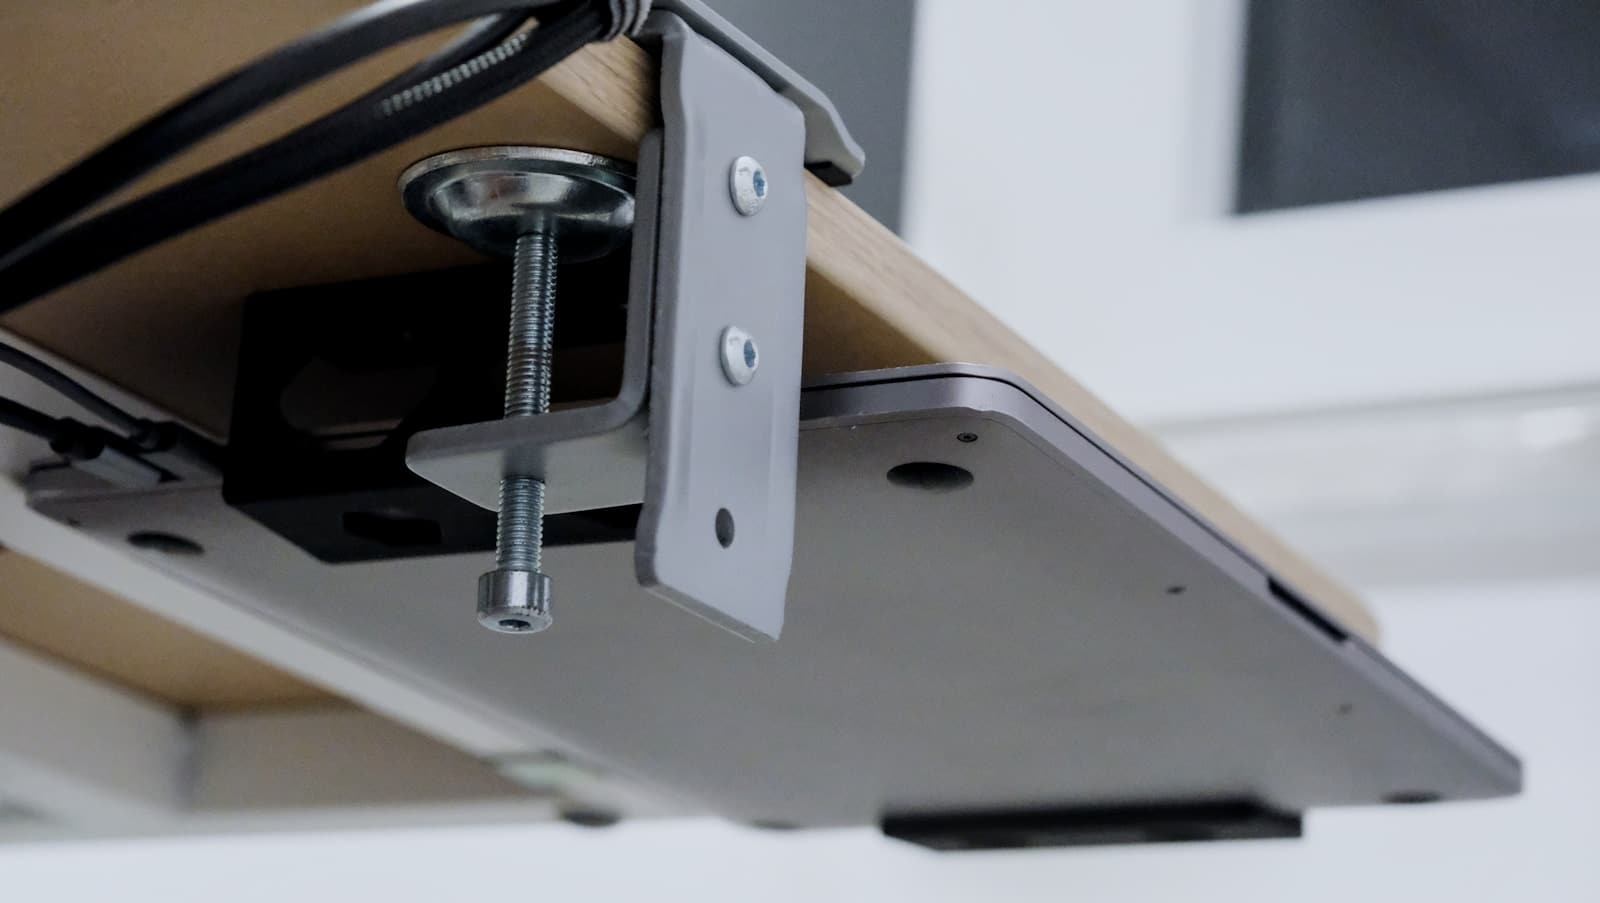 Photo: Bedirhan Gül via Unsplash. Cables thread through the clamp itself so nothing dangles when the arm pivots.
Standing desk tip: Buy cables that are 6 feet or longer. Standard 3-foot cables pull tight (or disconnect entirely) when you raise a standing desk to its full height.
Dual Monitor Mount Setup
A dual monitor setup is the most common multi-screen configuration for productivity. You have two choices: a single dual arm that holds both monitors from one base, or two separate single arms.
Single Dual Arm vs. Two Single Arms
| Single Dual Arm | Two Single Arms | |
|---|---|---|
| Clamp points | 1 | 2 |
| Height adjustment | Limited | Full, independent |
| Price | $30–80 total | $40–100 total |
| Best for | Matching monitors | Mismatched sizes |
If both your monitors are the same size and weight, a dual arm is simpler and uses one clamp point. If your monitors are different sizes (for example, a 27" primary and a 24" secondary), two single arms give you full independent control over each screen's position.
Positioning Two Monitors
Side by side (most common): Place your primary monitor directly in front of you. Angle the secondary monitor 15–30 degrees inward so you can see the full screen without turning your head more than 30 degrees. Both screens should be at the same height.
Stacked (vertical): Place the primary monitor at eye level and the secondary above it, tilted downward 15–20 degrees. This works well when desk width is limited. It does require more neck movement, so keep frequently used apps on the lower screen.
Buying criteria for dual arms: Check the combined weight capacity. Two 27" monitors weigh roughly 10–15 lbs each, so your arm needs to support 20–30 lbs total. Also verify the arm reach: each arm should extend at least 15 inches to let you angle screens inward without the bases colliding.
Curved monitors: If you are using two 32" curved monitors, measure the total width before buying a dual arm. Some dual arms do not extend far enough to prevent overlap between large curved panels. Two separate single arms solve this by letting you spread the clamp points further apart.
Quad Monitor Mount Setup
Four monitors require more planning than doubling a dual setup. The layout, GPU capacity, and mount hardware all change at this scale. For a Mac-specific walkthrough of 3- and 4-monitor configurations, see our multi-monitor Mac setup guide.
 Photo: AlphaTradeZone via Pexels. A portrait monitor on a swing arm flanks two stacked horizontal displays — a typical 3+1 trading layout.
Layouts
2x2 grid: Two monitors on the bottom row, two stacked on top. This is the most balanced layout. It keeps everything within a comfortable viewing arc and distributes weight evenly across the mount.
3+1 (three across, one above): Three monitors side by side with a fourth centered above the middle screen. This works well for trading desks, dashboards, or creative workflows where the bottom three are your primary workspace and the top screen is for reference.
Mount Hardware for Four Screens
A freestanding quad mount (a vertical pole with four arms) is the most practical option for four screens. It uses a single heavy base and requires no drilling. Desk-clamp quad mounts exist, but they put significant torque on the desk edge, especially with 27" panels.
Check the per-arm weight capacity and total capacity separately. A quad mount rated for "up to 32 inches" might only support four 24" monitors at full weight. Verify the actual weight of each monitor against the spec sheet.
GPU Requirements
Four monitors require enough video outputs on your GPU or dock. Most dedicated GPUs support four displays natively. On a Mac, Apple Silicon M1 Pro and above support multiple external displays natively. Base M1 and M2 chips are limited to one external display without a DisplayLink adapter. M3 and later support up to two external displays.
Check Apple's tech specs for your exact chip before buying a quad mount setup.
The Software Side: Brightness, Presets, and Sync
Every monitor mount guide ends at "plug it in and adjust the height." But once you have two or more monitors on arms, you hit a problem that hardware cannot solve: the screens look different.
Different monitors from different manufacturers (or even the same model from different production runs) display different brightness levels at the same percentage setting. Your 27" Dell at 50% brightness might look noticeably brighter or dimmer than your 27" LG at 50%. This mismatch is distracting and causes eye fatigue as your eyes constantly adjust between screens.
macOS and Windows do not offer built-in brightness control for external monitors. The OS brightness slider only controls the laptop's built-in display. To adjust an external monitor, you are stuck using the physical buttons on the monitor itself, navigating an on-screen menu that is different for every brand.
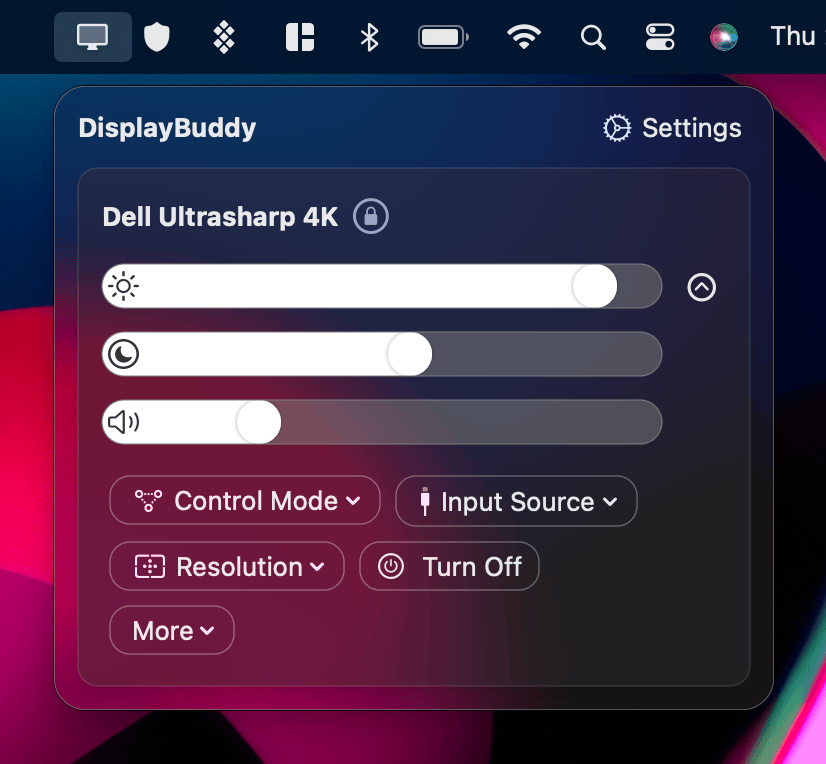
DisplayBuddy solves this. It controls external monitors directly via DDC/CI, short for Display Data Channel Command Interface — the same protocol the monitor's own buttons use — and works on both Mac and Windows.
Sync Brightness Across Every Monitor
DisplayBuddy's Sync feature links the brightness, contrast, and volume of all your connected monitors. Adjust one slider and every screen updates together. This eliminates the mismatch problem that plagues multi-monitor setups.
Save Display Presets for Different Workflows
Presets save your complete display configuration (brightness, contrast, volume, input source, and display arrangement) across all connected monitors with one click. Set up a "Day Mode" preset at 80% brightness, a "Night Mode" at 30%, and a "Presentation" preset that switches your secondary monitor's input source to your laptop's HDMI. Switch between them instantly.
This is DisplayBuddy's most-used feature. Instead of adjusting four monitors by hand every morning, you activate a preset and everything is set in seconds.
Automate Brightness with Schedules
Schedules let you automate display settings based on time of day, sunrise, sunset, or system events. Set your monitors to dim automatically at sunset and brighten at sunrise. Your screens adapt to ambient light conditions without any manual adjustment.
Use Your Keyboard Brightness Keys
On Mac, DisplayBuddy lets you use your keyboard brightness keys to control external monitors, just like you would with a built-in display. No need to reach for the monitor's physical buttons. On Windows, this works automatically after installation.
For brand-specific setup guides, see our pages for Dell, LG, AOC, ASUS, BenQ, HP on Windows, and Samsung Smart Monitors. You can also browse the full DisplayBuddy guides index or see DisplayBuddy pricing.
Common Problems with Monitor Mounts (and How to Fix Them)
Monitor Wobble
Cheap arms wobble when you type, especially on standing desks where the desk surface itself can vibrate. The fix: buy a gas spring arm from a reputable brand. Look for arms with a locking mechanism that lets you tighten the joints once you have found your position. If you already have a wobbly arm, check whether the tension adjustment screw (usually at the arm's pivot point) needs tightening.
Desk Damage from Clamp Mounts
C-clamps concentrate pressure on a small area of your desk edge. Soft wood, bamboo, and hollow-core desktops are especially vulnerable to denting or cracking. Use a metal spreader plate (included with some mounts, or available separately for a few dollars) between the clamp and your desk to distribute the pressure across a wider surface.
Cables Too Short
Standard monitor cables are 3 feet long. That is fine for a stock stand but too short for an arm that extends and pivots. Standing desks make this worse because the cable needs slack for the full range of desk heights. Budget for 6-foot HDMI, DisplayPort, or USB-C cables when you buy your mount.
Monitor Too Heavy for the Arm
Large monitors (32" ultrawides, TVs used as monitors) can exceed an arm's weight capacity. When this happens, the arm sinks slowly or drops to its lowest position. Always check your monitor's weight (found in the spec sheet, not the shipping box weight) against the arm's rated capacity before purchasing. A $30 arm rated for 17.6 lbs will not hold a 22-lb ultrawide.
No VESA Holes on Your Monitor
Some slim consumer monitors omit VESA mounting holes entirely. Before buying a mount, check your monitor's spec sheet for "VESA compatible" and the bolt pattern size. If your monitor lacks VESA holes, adapter plates ($10–20) clamp onto the stock stand neck and provide a 100x100 mm mounting surface. Verify the adapter supports your monitor's weight.
Not Enough Space Behind the Desk
Hinged monitor arms extend 4–6 inches behind the desk when the screen is pushed forward. If your desk is flush against a wall, you may not have room. Solutions: use a wall-mounted arm (attaches to a wall stud instead of the desk), a single-post desk mount with a limited rear profile, or pull the desk 6 inches from the wall.
Ergonomic Positioning Checklist
Use this as a quick reference after mounting your monitors. These guidelines apply to single, dual, and quad setups.
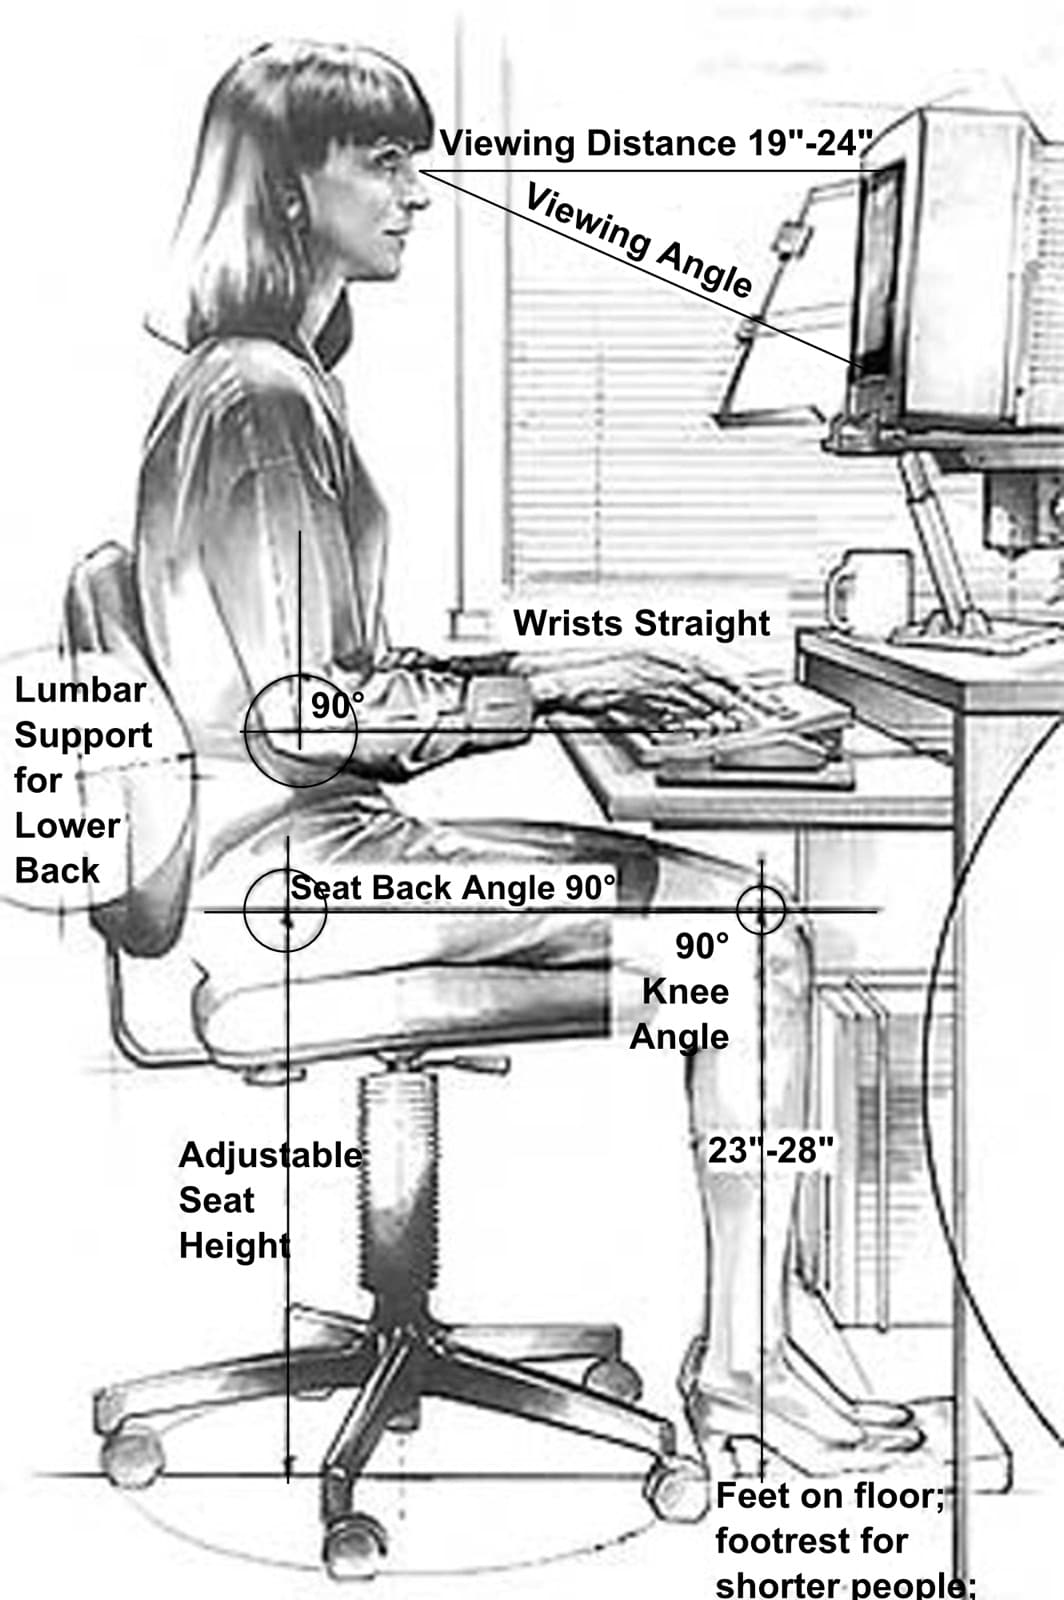
Screen height: Top edge of the screen at or slightly below eye level. Your eyes should rest naturally on the upper third of the display. If you wear bifocals or progressive lenses, lower the monitor an additional 2–3 inches so you can read through the correct part of the lens.
Viewing distance: Arm's length (20–26 inches) for standard monitors. For 32" or larger screens, add a few more inches. You should be able to read text without leaning forward.
Screen tilt: Tilt back 10–20 degrees to reduce glare from overhead lights and match the natural downward angle of your eyes.
Multi-monitor angle: Secondary screens angled 15–30 degrees inward. You should not have to turn your head more than 30 degrees from center to see any part of any screen.
Room lighting: Avoid placing monitors directly in front of or behind windows. Side lighting is ideal. Use indirect light sources (desk lamps pointed at the wall or ceiling) to reduce glare on your screens.
Brightness match: Match your screen brightness to the ambient light in the room. In a bright office, increase brightness. In a dark room, lower it. Use DisplayBuddy's Sync feature to keep all monitors at the same perceived brightness — and if you want each monitor showing accurate colors before you sync them, see our monitor calibration guide.
The 20-20-20 rule: Every 20 minutes, look at something 20 feet away for 20 seconds. This relaxes the focusing muscles in your eyes and reduces digital eye strain.
Blue light: Consider reducing blue light in the evening. Both macOS (Night Shift) and Windows (Night Light) have built-in blue light filters. For brightness-level automation, DisplayBuddy's Schedules can dim your monitors automatically at sunset.
Frequently Asked Questions
What is a VESA mount?
VESA (Video Electronics Standards Association) defines a standardized bolt pattern on the back of monitors. The most common pattern is 100x100 mm, meaning four screw holes spaced 100 mm apart in a square. This universal standard allows any VESA-compatible monitor to attach to any VESA-compatible arm, stand, or wall mount. Most monitors 22 inches and larger include VESA mounting holes.
How do I check if my monitor is VESA compatible?
Look at the back of your monitor for four threaded holes arranged in a square or rectangle. Measure the distance between them: 75 mm and 100 mm are the most common spacings. You can also check your monitor's product page or spec sheet, which will list "VESA compatible" and the specific mount pattern (e.g., VESA 100x100). If your monitor has no VESA holes, adapter plates are available that clamp onto the stock stand to provide a mounting surface.
Is it safe to mount a monitor on an arm?
Yes, as long as you stay within the arm's weight capacity. Check your monitor's actual weight (not the shipping box weight) and compare it to the arm's rated capacity. Use the correct screw size for your VESA pattern (M4 for 100x100 mm, M6 or M8 for larger patterns). Tighten screws firmly but do not overtighten, as this can strip the threads in the monitor housing.
What is the difference between a clamp mount and a grommet mount?
A clamp mount grips the edge of your desk with a C-clamp. No drilling required, and it is removable. A grommet mount bolts through a hole drilled in the desk surface. Grommet mounts are more stable and handle heavier monitors better, but they require a permanent hole in your desk. Most people choose clamp mounts for flexibility.
Will a monitor arm damage my desk?
Clamp-style arms can dent or crack soft wood, bamboo, and hollow-core desktops if installed without protection. Place a metal spreader plate (a thin steel plate that distributes clamping pressure) between the clamp and your desk surface. Many monitor arms include one in the box. If yours does not, generic spreader plates cost a few dollars and prevent damage.
How do I set up dual monitors ergonomically?
Place your primary monitor directly in front of you at arm's length, with the top edge at eye level. Position the secondary monitor to one side, angled 15–30 degrees inward, at the same height. Both screens should be close enough that you do not have to turn your head more than 30 degrees to see any part of either display. Use DisplayBuddy's Sync to keep brightness consistent across both screens.
Can I use a dual monitor mount with a standing desk?
Yes. In fact, a monitor arm is more important on a standing desk because the optimal screen height changes as you raise and lower the desk. Choose a gas spring arm for tool-free height adjustment. Buy cables at least 6 feet long to accommodate the desk's full range of motion. Check that the combined weight of both monitors is within the arm's capacity, as standing desk vibrations can cause undersized arms to sag or wobble.
Do I need two separate arms or one dual arm for two monitors?
If both monitors are the same size and weight, a single dual arm is simpler and uses one clamp point. If your monitors are different sizes, or if you are using large curved panels that might overlap, two separate single arms give you fully independent height, tilt, and distance control for each screen. Two single arms also let you spread the clamp points further apart on the desk edge.
How do I keep brightness consistent across multiple monitors?
Different monitors display different brightness levels at the same percentage setting due to different panels, backlights, and calibration. DisplayBuddy solves this with its Sync feature: link all connected monitors so adjusting one slider updates every screen simultaneously. It works on both Mac and Windows and supports any monitor that uses DDC/CI, including models from Dell, LG, BenQ, ASUS, Acer, Samsung, and HP.
What is the best monitor layout for a quad setup?
The two most common layouts are a 2x2 grid (two on the bottom, two stacked on top) and a 3+1 arrangement (three across the bottom, one centered above). The 2x2 grid keeps everything within a tighter viewing arc and distributes weight evenly across the mount. The 3+1 layout is better if your primary work happens across three horizontal screens and the fourth is a reference display. Use a freestanding quad mount rather than a desk clamp for four screens, as the torque on the desk edge is significant.
DisplayBuddy
for macOS 10.13+
Take control of your monitors
Control brightness, contrast, volume, and much more.
Buy NowLifetime license • 7-day refunds no questions asked