How to Calibrate Your Monitor: Mac & PC Guide (2026)
Step-by-step monitor calibration for Mac and Windows. Covers built-in tools, colorimeters, free online tests, and how to save your settings.
Your monitor is lying to you. Every display ships from the factory with colors tuned to look punchy on a store shelf, not accurate on your desk: whites lean blue, contrast is overdriven, and brightness sits far higher than is comfortable for all-day use.
To calibrate a monitor, you adjust its white point, gamma, brightness, and contrast to match a known standard (usually sRGB, or DCI-P3 or Adobe RGB for professional work). The fastest method is your operating system's built-in tool: on Mac, open System Settings > Displays > Color Profile > Customize and run the Display Calibrator Assistant; on Windows, search "Calibrate display color" to launch the DCCW wizard. Each takes a few minutes. For professional accuracy, use a hardware colorimeter with software like DisplayCAL, which takes under an hour.
That is the short answer, and for casual use it is enough. The rest of this guide walks through each method in detail, plus free online test images and how to keep calibration consistent across multiple monitors and after sleep or reboot.
What Is Monitor Calibration?
Monitor calibration is the process of adjusting a display's settings so it reproduces colors, brightness, and contrast as accurately as possible. The goal is to match a known reference standard (usually sRGB for general use, or DCI-P3 / Adobe RGB for professional photo and video work).
Three settings matter most:
| Setting | Standard | What goes wrong if it is off |
|---|---|---|
| White point (color temperature) | 6500K / D65 | Cooler factory default pushes colors blue |
| Gamma | 2.2 | Too high crushes shadows; too low looks washed out |
| Brightness | ~120 cd/m² | Too high strains eyes; too low loses shadow detail |
Who needs it? Photographers, video editors, designers, illustrators, and web developers depend on accurate color. It also helps everyone else: truer colors when shopping online, better shadow detail in games, and less eye strain once you drop brightness off the harsh factory default.
Monitor Calibration Methods at a Glance
Every calibration method trades cost against accuracy. Here is how they compare.
| Method | Strength | Best For |
|---|---|---|
| Monitor OSD buttons | Low | Quick brightness fixes |
| macOS Calibrator Assistant | Medium | A custom Mac profile |
| Windows DCCW wizard | Medium | First-time Windows setup |
| Online test images | Medium | No-install spot checks |
| Colorimeter + DisplayCAL | High | Pro photo, video, print |
| DDC/CI app (DisplayBuddy) | Locks in any accuracy | Multi-monitor workflows |
The first five methods all calibrate your monitor. The last one (DDC/CI apps like DisplayBuddy) solves a different problem: once you have dialed in the right settings, Presets let you save and recall them instantly across different workflows (photo editing, gaming, night mode) without recalibrating each time.
How to Calibrate Your Monitor on Mac
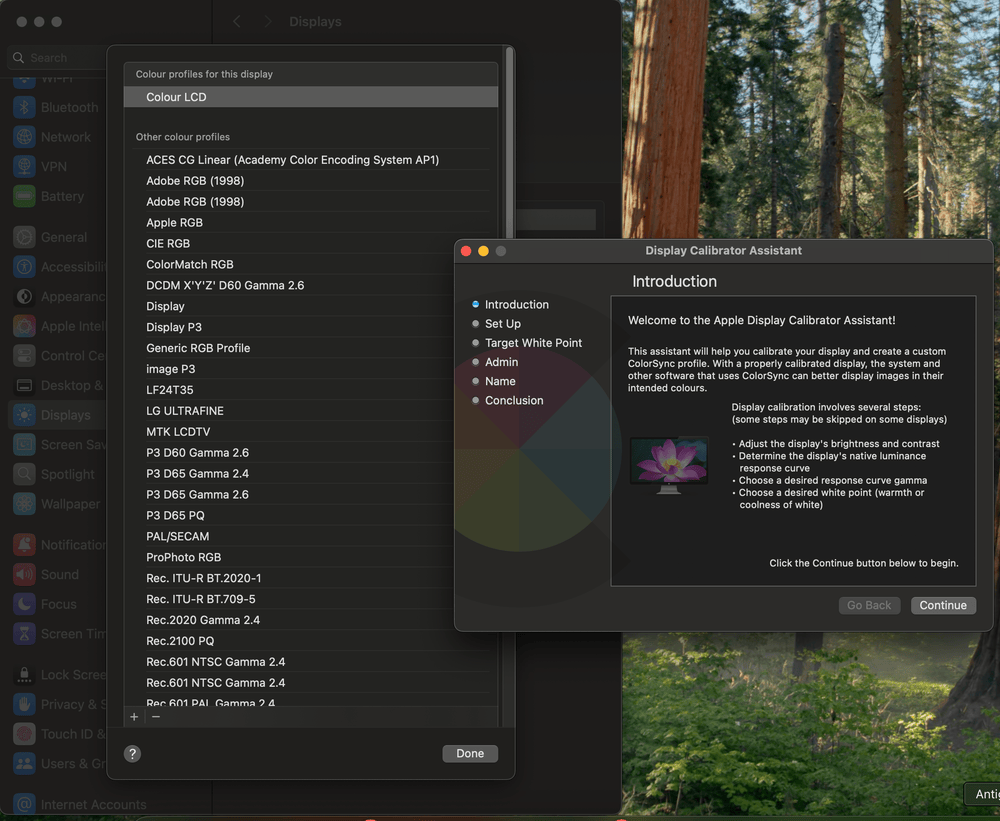
Using the macOS Display Calibrator Assistant
Apple ships a built-in calibration wizard on every Mac. The path has changed across recent macOS versions, which causes confusion.
On macOS Sequoia and Sonoma:
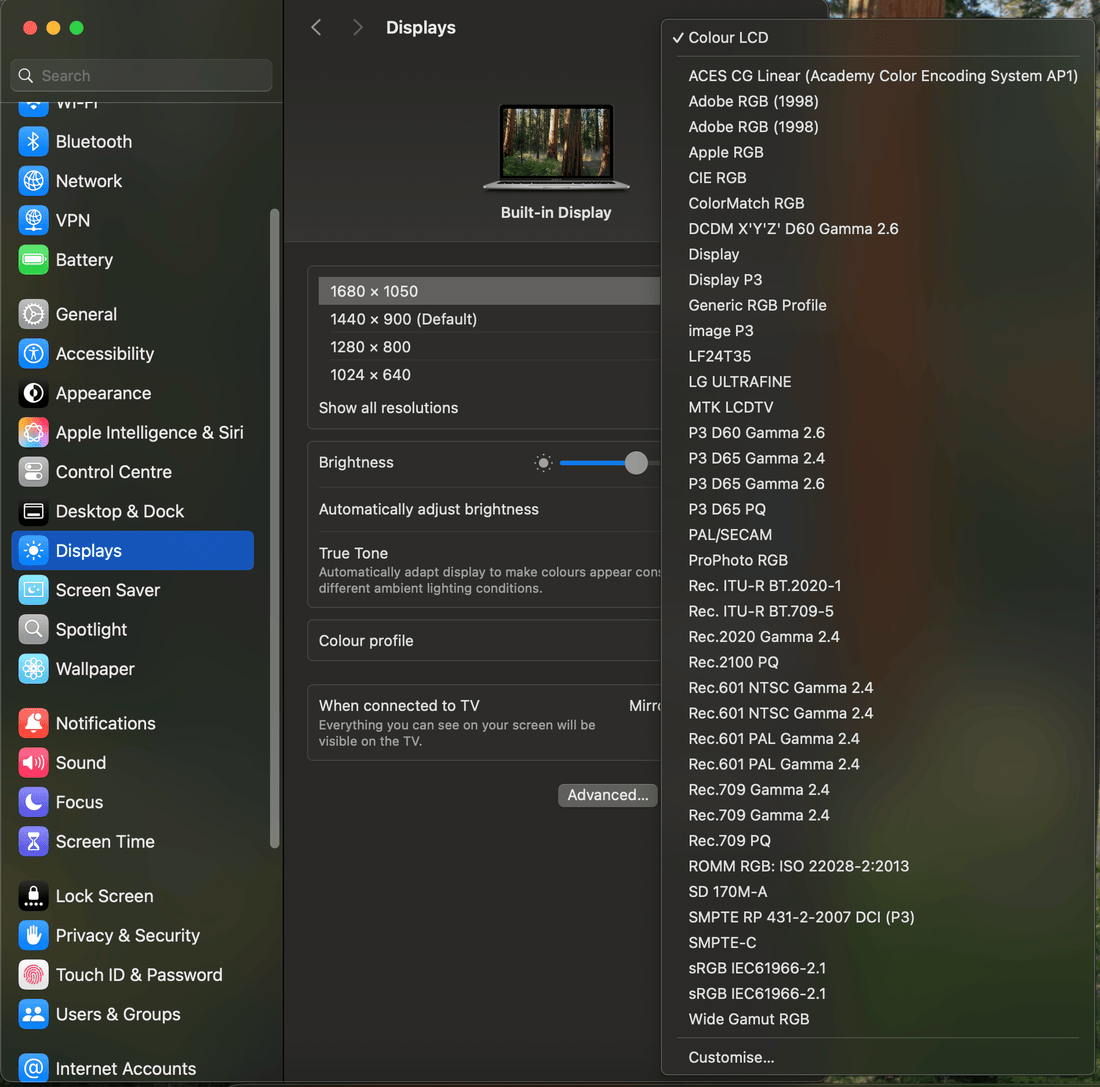
- Open System Settings > Displays.
- Click the Color profile popup menu.
- Click Customize at the bottom of the list.
- Click the Add (+) button to launch the Display Calibrator Assistant.
- Follow the on-screen steps: set white point target (use D65 / 6500K for most work), adjust gamma (use 2.2), and name your profile.
- Click Done. The new profile appears in the dropdown and is applied immediately.
Note: On Intel Macs and many third-party external displays, you can reach an undocumented Expert Mode by holding the Option key while clicking Add (or by launching /System/Library/ColorSync/Calibrators/Display Calibrator.app directly with Option held), which adds native gamma and white point fine-tuning controls. Apple does not document this and the behavior varies by macOS version. On Apple Silicon Macs with factory-calibrated displays (Studio Display, Pro Display XDR, or a 2021-or-later MacBook Pro), macOS opens the Pro Display Calibrator instead, and the classic Expert Mode sliders are not available.
What macOS Calibration Actually Changes
The Display Calibrator Assistant creates a software ICC profile. It does not touch your monitor's hardware. Here is the split:
| Software profile (changed) | Monitor hardware (unchanged) |
|---|---|
| ICC profile via ColorSync, on GPU output | Brightness, contrast, color modes: OSD or a DDC/CI app (DisplayBuddy) |
| No DDC/CI to external displays by default | Hardware brightness: monitor buttons or DDC/CI app |
So if the white point looks right after calibrating but the screen is still too bright, that is expected: the profile changed, the hardware did not. Lower brightness with the monitor's buttons or a DDC/CI app that talks to the panel directly.
Color Profiles for External Monitors on Mac
macOS handles color management differently for built-in and external displays. Built-in Retina panels ship with factory-measured ICC profiles that are reasonably accurate. External monitors get a generic profile that may not match the panel at all.
Common issues Mac users report with external monitor color management:
- Default profiles push wrong colors. A generic profile applied to a Dell or LG monitor can shift everything warm or cool. Creating a custom profile with the Display Calibrator Assistant usually fixes this.
- Custom ICC profiles disappear from the dropdown. This happens when profiles are saved to the wrong directory. Place custom .icc files in
/Library/ColorSync/Profiles/and restart. - Profiles reset after sleep or restart. macOS sometimes reverts to the default profile when an external monitor reconnects. This is a persistent bug across multiple macOS versions, and it is one reason many users switch to a DDC/CI app like DisplayBuddy to manage monitor settings independently of macOS color management.
If you use an Apple Studio Display or Pro Display XDR, or a MacBook Pro from 2021 or later, Apple recommends the Pro Display Calibrator instead of the standard Display Calibrator Assistant. These displays also support Reference Modes, pre-calibrated presets for specific workflows (photography, video, design) that are accurate out of the box. The tradeoff: Reference Modes lock brightness to a fixed level, which can be inconvenient for daily use.
How to Calibrate Your Monitor on Windows
Using Windows Display Color Calibration
Windows ships a dedicated calibration wizard called DCCW (Display Color Calibration for Windows). It walks you through gamma, brightness, contrast, and color balance step by step.
On Windows 11 and Windows 10:
- Press Win + S and search "Calibrate display color".
- Follow the wizard: adjust gamma using the slider until the dots in the test image are barely visible.
- Set brightness using your monitor's physical buttons until the X in the dark image is just barely visible but the background stays black.
- Set contrast using your monitor's physical buttons until the shirt and buttons in the test image are both visible.
- Adjust color balance by moving the red, green, and blue sliders until the gray bars look neutral (no color tint).
- Click Current calibration to accept, then check "Start ClearType Tuner" and finish.
Limitations to know about: The Windows calibration tool is old and has quirks. The calibration profile takes up to a minute to apply after reboot. Some full-screen applications (particularly games) can override it. And if you update your GPU drivers, the calibration may reset. Despite these issues, it is still a significant improvement over factory defaults for most monitors.
Using the Windows HDR Calibration Tool
If your monitor supports HDR, Windows 11 includes a separate HDR calibration tool.
- Open Settings > System > Display > HDR.
- Click "Calibrate" to launch the Windows HDR Calibration app (free from the Microsoft Store if not pre-installed).
- Follow the on-screen steps to set minimum and maximum luminance levels.
- Save the profile.
Note that HDR calibration is separate from SDR calibration. You may want to run both if you switch between HDR and SDR content. Most PC games include their own HDR calibration sliders in graphics settings, which override the Windows-level calibration.
Using GPU Control Panels
NVIDIA Control Panel, AMD Radeon Software, and Intel Arc Control all include color adjustment panels (brightness, contrast, gamma, digital vibrance / saturation). These sit between the OS calibration and your monitor's OSD. Note that GPU-panel color settings are stored in the driver's own configuration, so a clean driver install resets them to defaults, and some driver releases have shipped bugs that wipe them on reboot until you roll back.
For NVIDIA: NVIDIA Control Panel > Display > Adjust desktop color settings. For AMD: Radeon Software > Display > Color. These are useful as a secondary adjustment layer if the Windows calibration tool alone is not enough, but they should not be your first stop.
How to Color Calibrate with a Hardware Colorimeter
For professional photo editing, video color grading, or print design, software-only calibration is not accurate enough. A hardware colorimeter (a sensor that physically measures the light coming from your screen) is the gold standard.
What You Need
- A colorimeter. Popular options include the Calibrite ColorChecker Display (formerly X-Rite i1Display), the Datacolor SpyderX series, and the Calibrite Display Plus. Prices range from $100 to $250. You can also rent colorimeters from camera rental services if you only need to calibrate occasionally.
- Calibration software. Most colorimeters ship with vendor software, but the community strongly recommends DisplayCAL (free, open-source) for more accurate and customizable results. Note that the original DisplayCAL stalled at Python 2 end-of-life; the actively maintained version is now the community Python 3 port (latest 3.9.17, September 2025). Prebuilt installers exist for Mac, Windows, and Linux, but setup can be finicky. On macOS the app is not notarized, so you must clear its quarantine flag from Terminal before it will launch.
Step-by-Step with DisplayCAL
- Download and install DisplayCAL (available for Mac, Windows, and Linux).
- Plug in your colorimeter. DisplayCAL detects it automatically.
- Select your target settings: white point D65 (6500K), gamma 2.2, and calibration speed (medium is a good balance of speed and accuracy).
- Click Calibrate & Profile. DisplayCAL flashes color patches on screen while the colorimeter measures each one. This typically takes 15 minutes or more depending on measurement settings.
- When finished, DisplayCAL generates an ICC profile and installs it as your active color profile.
The resulting ICC profile is far more accurate than anything you can achieve by eye. How widely it applies depends on your OS:
- Mac: ICC profiles are system-wide through ColorSync, so every application benefits. This is one area where macOS color management genuinely works better than Windows.
- Windows: ICC profiles only apply to color-managed apps (Adobe Creative Suite, Affinity suite, some browsers). Non-color-managed apps (most games, basic media players, the Windows desktop) receive only a partial correction via the GPU gamma table. This is a Windows limitation, not a DisplayCAL limitation.
Free Online Monitor Calibration Tools and Test Images
If you do not want to install anything, online test images let you visually check and adjust your monitor's settings through your browser. They are less precise than the OS calibration wizards or a colorimeter, but they are useful for quick spot-checks.
Lagom LCD Monitor Test Pages
Lagom.nl is the most widely referenced free online calibration tool. It provides test images for:
- Black level: Can you distinguish near-black shades from pure black? If not, your brightness is too low or your contrast too high.
- White saturation: Can you distinguish near-white shades from pure white? If not, your brightness or contrast is too high.
- Gamma: Test patterns that should blend to specific gray levels at gamma 2.2.
- Color gradients: Smooth ramps from black to primary colors and white. Banding indicates insufficient bit depth or a poor ICC profile.
Use these images to adjust your monitor's OSD settings (brightness, contrast, color temperature) until each test passes.
Other Free Test Images
Several other sites offer free calibration test images. Search for "monitor calibration test image" to find current options. Look for tests that check black level (near-black patch visibility), white saturation (near-white patch visibility), and gamma (striped pattern blending).
These online tools are most effective when paired with your monitor's physical OSD controls. Adjust brightness, contrast, and color temperature using the buttons on your monitor, not software sliders, for the most stable results.
Keeping Multiple Monitors Calibrated
Calibrating a single monitor is straightforward. Keeping two or three monitors looking the same is where things fall apart.
The core problem: every monitor panel has slightly different characteristics, even two units of the same model. A hardware colorimeter generates a unique ICC profile per panel, which helps. But brightness and contrast still drift independently on each display, and macOS and Windows both lack any built-in tool for syncing display settings across monitors.
Common pain points users report:
| Pain point | What happens |
|---|---|
| Brightness mismatch | Both set to 120 nits; one auto-adjusts by afternoon, the other does not |
| ICC profiles reset | macOS reverts custom external profiles after sleep, restart, or unplug |
| Switching workflows | Each task needs different settings; manual per-monitor retuning is unrealistic |
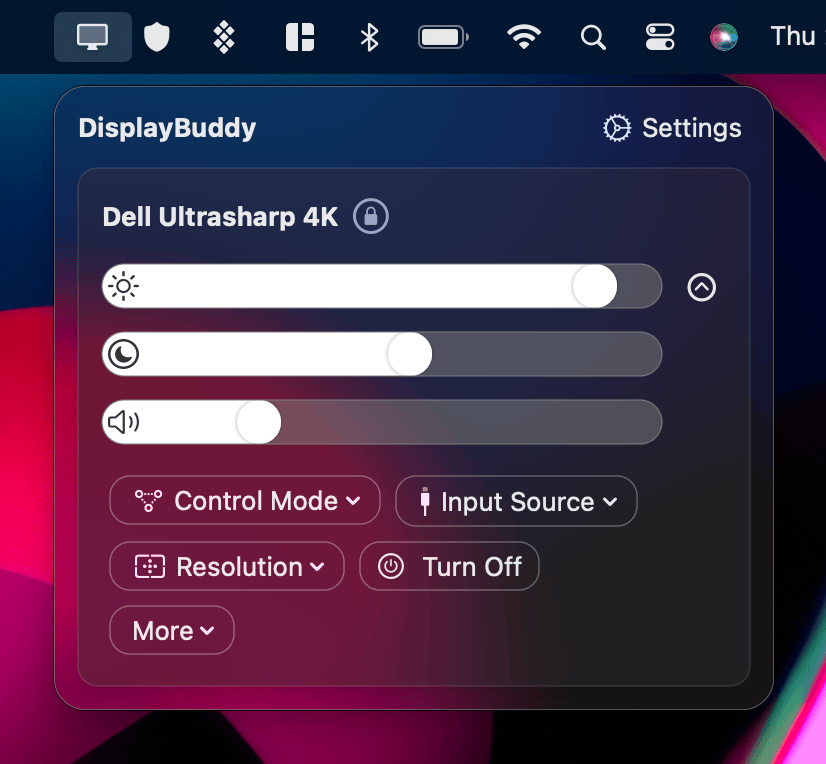
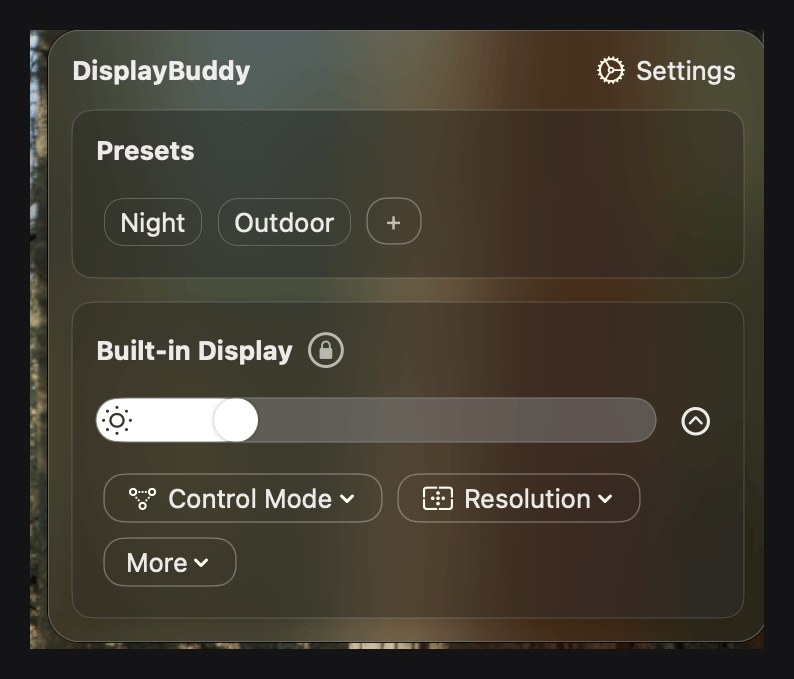
This is the problem DisplayBuddy Presets solve:
- Calibrate your monitors once, using any method in this guide.
- Save the calibrated brightness, contrast, and volume as a named Preset.
- Switch between "Photo Editing," "Gaming," and "Night Mode" in one click.
DisplayBuddy drives the monitor hardware directly via DDC/CI, so the changes happen at the panel level, not as a software overlay.
DisplayBuddy's Sync feature goes further: adjust brightness on one monitor, and all connected displays follow proportionally. Combined with keyboard brightness key support for external monitors, it eliminates the most common post-calibration frustrations.
Save Your Calibrated Settings with DisplayBuddy
Calibration sets targets. DisplayBuddy lets you keep them.
After you calibrate (using the macOS wizard, Windows DCCW, or a colorimeter), the values live in your monitor's OSD settings and your OS color profile. Those settings are fragile:
- OSD settings reset after firmware updates.
- ICC profiles revert after sleep.
- There is no OS-level way to save multiple calibration states and switch between them.
DisplayBuddy solves this with three features:
Presets. Save your current brightness, contrast, and volume across all connected monitors as a named preset. Create separate presets for different workflows: "Photo Editing" at 120 nits with a neutral white point, "Gaming" at higher brightness and contrast, "Night Mode" at reduced brightness and warmer tones. Recall any preset in one click from the menu bar (Mac) or system tray (Windows).
Sync. When you adjust brightness on one monitor, all connected monitors follow proportionally. This keeps your multi-monitor setup matched without manually adjusting each display.
Schedules. Automate brightness changes by time of day, battery level, or system events. Drop to your Night Mode preset at sunset. Boost brightness when you plug into power. Set it once, and calibrated settings apply themselves.
DisplayBuddy works on Mac and Windows with a single lifetime license. It supports every DDC/CI-compatible monitor from Dell, LG, Samsung, BenQ, ASUS, Acer, HP, and more. Samsung & LG Smart Monitors are supported over Wi-Fi.
For a full comparison of DDC/CI apps, see the monitor brightness control guide, or compare DisplayBuddy against BetterDisplay and MonitorControl.
Frequently Asked Questions
Can you calibrate a monitor without a colorimeter?
Yes. The built-in calibration tools on Mac and Windows produce a noticeable improvement over factory defaults without any hardware. Online test images from sites like Lagom.nl let you fine-tune further. A hardware colorimeter ($100–250) is only necessary if you need professional-grade color accuracy for photo editing, video color grading, or print design work where color fidelity directly affects the output. For general use, gaming, and web browsing, software calibration is enough.
What happens if I skip calibration?
Your monitor displays whatever the factory decided looked good on a store shelf. That typically means an overly blue white point, crushed shadows, and brightness set far higher than comfortable for all-day use. Colors in photos and videos will not match what the creator intended. For casual browsing this is tolerable, but for any work involving color (photography, design, video editing, even online shopping), uncalibrated displays cause misjudgments that carry through to the final output.
Is it necessary to calibrate a monitor?
For professional color work (photo editing, video grading, print design), yes. Calibration is the only way to ensure what you see on screen matches the final output. For general use, it is not strictly necessary, but even a five-minute calibration using the built-in OS tool noticeably improves comfort and color accuracy. The biggest benefit for casual users is often just reducing brightness from the eye-straining factory default.
How do I tell if my monitor is calibrated?
Open a test image from Lagom.nl in your browser. Check three things: (1) you can distinguish near-black patches from pure black, meaning your brightness is set correctly; (2) you can see near-white patches as distinct from pure white, meaning contrast is not overblown; (3) gray test patterns look neutral with no visible color tint. If all three pass, your monitor is reasonably well calibrated. For professional verification, a colorimeter measures Delta E (color accuracy deviation) numerically.
How do I recalibrate my screen?
Run the same calibration process you used initially. On Mac: System Settings > Displays > Color Profile > Customize > Add. On Windows: search "Calibrate display color." If you used a hardware colorimeter, reconnect it and run DisplayCAL again. For professional work, recalibrate monthly since backlights drift over time. To avoid losing your calibrated settings between sessions, save your brightness, contrast, and volume levels as a DisplayBuddy Preset so you can recall them instantly after sleep, reboots, or OS updates.
How do I calibrate a gaming monitor for color accuracy?
Start with your monitor's OSD: set the color mode to sRGB or Standard (not Vivid or Game), white point to 6500K, and gamma to 2.2. Then run your OS calibration wizard for fine-tuning. Note that ICC color profiles on Windows only apply to color-managed applications. Most games are not color-managed, so they receive only partial correction through the GPU gamma table. On Mac, ICC profiles apply system-wide through ColorSync, so games benefit automatically. For the most accurate gaming colors on Windows, some users apply 3D LUTs through ReShade. Only do this in single-player games: ReShade injects into the game, so using it in competitive multiplayer titles with kernel-level anti-cheat (Valorant, Call of Duty, Rust) can trigger account bans, and some of those games now block it outright.
How do I calibrate my monitor so my pictures look good on other screens?
Calibrate to the sRGB standard (D65 white point, 2.2 gamma). sRGB is the default color space for the web and most consumer displays. When your monitor accurately displays sRGB, the colors you see while editing will closely match what others see on their screens (assuming theirs are also near the sRGB standard, which most modern displays are). For print work, calibrate to your target color space (Adobe RGB or CMYK profile) and soft-proof before printing.
Does a new monitor come pre-calibrated?
Most monitors ship with a factory calibration, but it is tuned for showroom appeal rather than accuracy. Colors are boosted, brightness is set high, and the white point is often cooler than the D65 standard. Some professional-grade monitors (like those from Eizo, BenQ with factory calibration reports, or Apple's Pro Display XDR) ship with factory calibration tuned for accuracy. Consumer monitors almost always benefit from user calibration after purchase.
DisplayBuddy
for Mac and Windows
Take control of your monitors
Control brightness, contrast, volume, and much more.
Buy NowLifetime license • 7-day refunds no questions asked