Laptop Brightness Keys Not Working on External Monitor? Fix
Your laptop's brightness keys don't control external monitors by default. Enable them in 60 seconds with DisplayBuddy. Works on Mac and Windows.
Your laptop's brightness keys do not control external monitors by default. On both macOS and Windows, those keys are wired only to the built-in panel. DisplayBuddy intercepts the brightness keys and routes them to any DDC/CI-compatible external monitor in about 60 seconds, and works identically on Mac and Windows. Below: the setup, the four most common reasons the keys stop responding (and the fix for each), and shortcut options for keyboards that lack dedicated brightness keys.
| Feature | Supported |
|---|---|
| 💻 Mac models | MacBook, Mac Mini, Mac Studio, Mac Pro (all Macs supported) |
| 🪟 Windows PCs | Laptops and desktops with DisplayBuddy for Windows |
| ⌨️ Keyboards | MacBook built-in, Apple Magic Keyboard, Logitech MX Keys, Keychron, any keyboard with brightness keys |
| 🖥️ Monitors | Any DDC/CI-compatible display (Dell, LG, BenQ, ASUS, AOC, HP, ViewSonic, Samsung, and more) |
| 🔌 Connection | HDMI, USB-C, DisplayPort, Thunderbolt |
| 🎛️ Control modes | Active monitor only, or all displays at once |
Why Brightness Keys Don't Work on External Monitors
Most external monitors support a protocol called DDC/CI (Display Data Channel Command Interface), which lets software send hardware commands directly to the panel: adjust brightness, change contrast, control volume. DDC/CI is the standard most external monitors use.
The problem is that macOS and Windows do not extend their own brightness controls over DDC/CI. The keyboard brightness keys, the brightness slider in System Settings (Mac) or Quick Settings (Windows), and the Control Center / Action Center sliders are all wired to your laptop's built-in panel. Once you plug in an external monitor, those controls simply do not reach it.
This is an OS limitation, not a monitor fault. DisplayBuddy fixes it by intercepting your brightness key presses and routing them to your external monitor via DDC/CI.
How to Enable Brightness Keys for External Monitors
Your laptop's external display brightness can be wired to your keyboard in about 60 seconds:
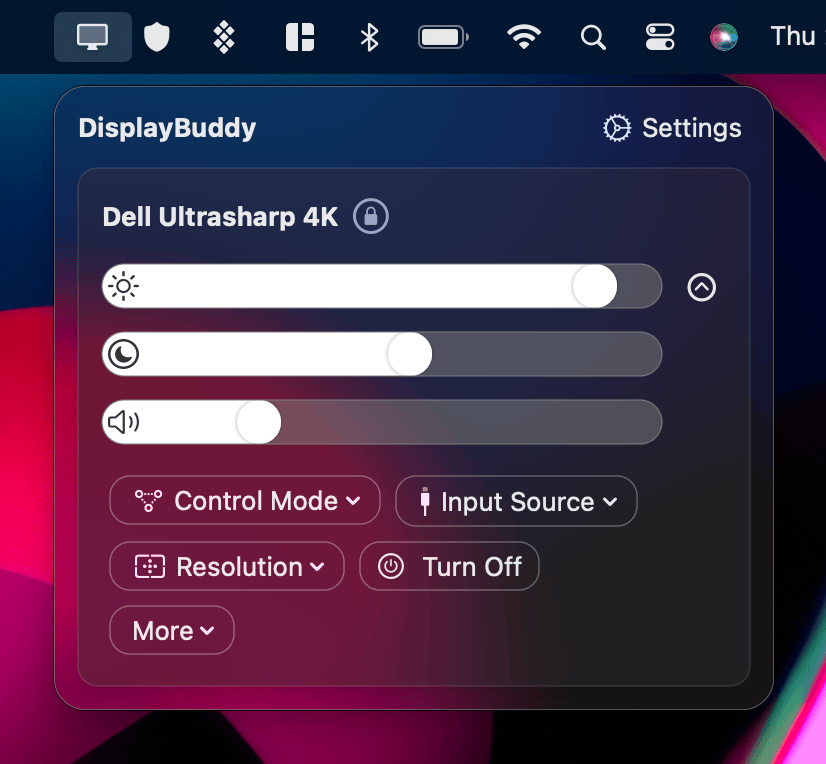
- Open DisplayBuddy and click the Settings icon
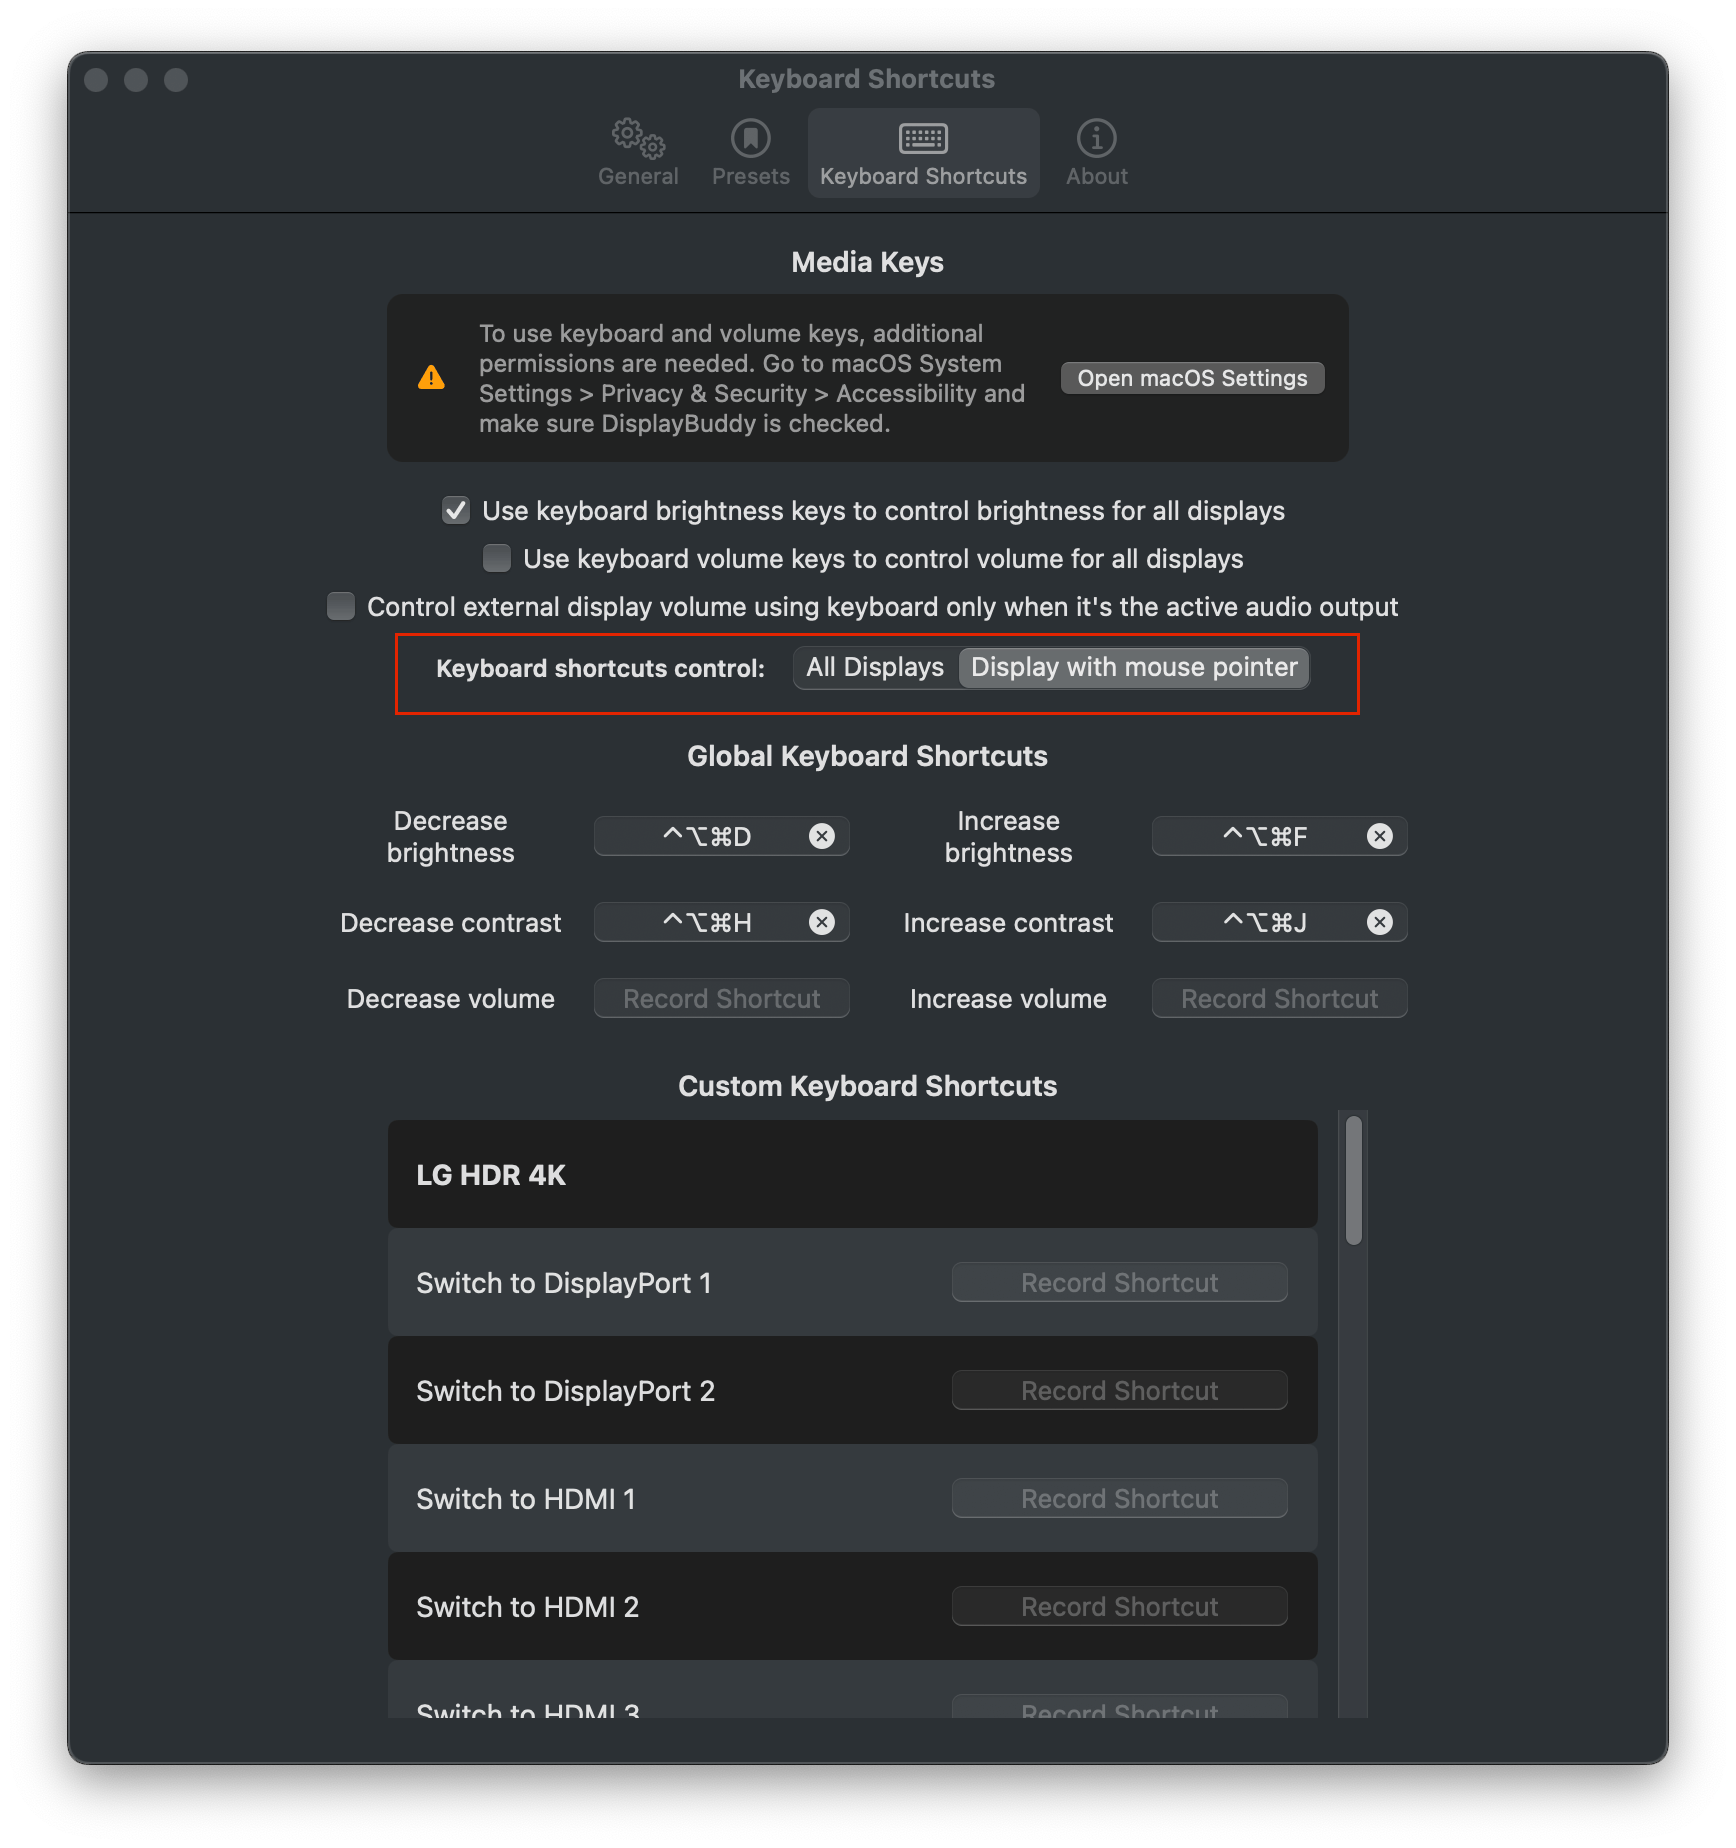
- Go to Preferences, then Keyboard Shortcuts
- Check "Use Brightness keys to control brightness for all displays"
- macOS will prompt for Accessibility permissions. Go to System Settings, then Privacy and Security, then Accessibility, and enable DisplayBuddy
- Press your brightness keys. They now control your external monitor
On Windows? DisplayBuddy for Windows enables the same flow with the Fn + brightness keys most laptops ship with, no separate setup beyond installing the app. See the DisplayBuddy for Windows page.
Which Keyboards Are Supported
DisplayBuddy works with the brightness keys on any keyboard:

If your keyboard does not have dedicated brightness keys, you can assign any custom key combination instead under Keyboard Shortcuts in DisplayBuddy's settings.
What If It Stops Working? Common Fixes
Brightness keys stopped working after a macOS update
If your brightness keys were working and stopped after a macOS update, the most common cause is that the Accessibility permission DisplayBuddy needs was revoked or has to be re-granted. This is the same regression that surfaced in MonitorControl issue #1120. DisplayBuddy is affected for the same underlying reason. Open System Settings, then Privacy and Security, then Accessibility, remove DisplayBuddy from the list, then re-add it and re-grant the permission. The keys will work again immediately.
macOS Sequoia is intercepting the F-keys
Some users have reported that on macOS Sequoia, the native brightness slider intercepts the F1 and F2 keys before DisplayBuddy receives them. The fix is to assign a custom keyboard shortcut to brightness up and down in DisplayBuddy's Keyboard Shortcuts settings. Any unused combination works (e.g. Option + F1 / F2, or a chord like Ctrl + Shift + Up / Down). Use that custom shortcut instead of the default F-keys.
Monitor is behind a USB-C dock or DisplayLink hub
Some docks and DisplayLink hubs strip DDC/CI commands before they reach the monitor. If your brightness keys work for a directly-connected monitor but not for one behind a dock, switch DisplayBuddy's Control Mode to Software Dimming for that specific display. Software Dimming applies a software overlay that works on any display, including DisplayLink-connected screens, and your brightness keys will then control it the same way.
Third-party keyboard (Keychron) brightness keys behave differently
Keychron keyboards using QMK firmware (K3 Pro, K3 Max, and similar models) emit standard keycodes rather than the Apple-specific media protocol for brightness. Per Keychron, this means macOS treats those keys as plain F-keys rather than brightness keys. The workaround is to assign a custom shortcut in DisplayBuddy that matches the Keychron's F-keys (or any combination you prefer), and the keys will route through DisplayBuddy correctly.
Choosing How Your Brightness Keys Behave
Once enabled, you can choose between two modes:
| Mode | How it works | Best for |
|---|---|---|
| Display with mouse pointer (default) | Brightness keys adjust only the monitor your cursor is currently on | Most setups; natural and precise |
| All displays at once | Every connected monitor adjusts simultaneously by the same amount | Multi-monitor setups where you want all screens to match |
You can switch between these any time under Preferences in Keyboard Shortcuts.
Clamshell Mode and Desktop Macs
If you run your MacBook with the lid closed (clamshell mode) and connected to an external monitor, the built-in brightness keys are not physically reachable. DisplayBuddy handles this: once you assign a custom keyboard shortcut to brightness control, it works the same way regardless of whether the MacBook lid is open or closed.
The same applies to Mac Mini, Mac Studio, and Mac Pro: any Mac without a built-in keyboard. Assign a custom shortcut in DisplayBuddy and your external keyboard's keys will route to whichever external monitor is currently active.
Going Further: Presets, Sync, and Schedules
Brightness keys are the quick manual adjustment. Once you have them working, three DisplayBuddy features take things further:
- Presets save a complete display configuration (brightness, contrast, and volume) and switch between them with one shortcut. Save a "Morning" preset at 80% and a "Night" preset at 25%, then switch between them with one keypress instead of nudging the brightness keys repeatedly.
- Sync keeps multiple monitors consistent. Adjust one screen and the others follow, with contrast and volume included, not just brightness.
- Schedules automate the brightness change by time of day. The Morning preset can apply at 8 AM, the Night preset at 8 PM, with no key press required.
Frequently Asked Questions
Why don't my Mac brightness keys work on my external monitor?
macOS only sends brightness commands to its own built-in displays. External monitors connected via HDMI, USB-C, or DisplayPort are not controlled by the brightness keys or the System Settings slider by default. This is a macOS limitation. DisplayBuddy fixes it by intercepting your brightness key presses and sending DDC/CI commands to your external monitor directly.
How do I make my Mac brightness keys control an external monitor?
Open DisplayBuddy, go to Preferences, then Keyboard Shortcuts, and check "Use Brightness keys to control brightness for all displays." Grant Accessibility permissions when prompted. Your brightness keys will immediately work on any connected external monitor.
Do brightness keys work with all external monitors on Mac?
DisplayBuddy supports brightness key control for any monitor that supports DDC/CI, which covers the vast majority of displays from Dell, LG, BenQ, ASUS, AOC, HP, ViewSonic, and more. Samsung Smart Monitors use a separate Wi-Fi connection but are also supported. If you are unsure whether your monitor is compatible, you can test it with DisplayBuddy's 7-day return policy on Mac.
Can I use brightness keys on Mac Mini or Mac Studio with no built-in screen?
Yes. DisplayBuddy works on Mac Mini, Mac Studio, and Mac Pro: any Mac connected only to external displays. Assign a custom keyboard shortcut in DisplayBuddy's settings and use it exactly as you would use brightness keys on a MacBook.
What if only one of my monitors adjusts when I press the brightness keys?
Check which control mode is selected under Preferences in Keyboard Shortcuts. "Display with mouse pointer" adjusts only the monitor your cursor is on. Switch to "All displays" if you want every connected monitor to adjust simultaneously.
Does DisplayBuddy work in clamshell mode?
Yes. Assign a custom keyboard shortcut to brightness control in DisplayBuddy's settings. It will work with any external keyboard even when your MacBook lid is closed.
Why did my brightness keys stop working after a macOS update?
The most common cause is that macOS reset or revoked the Accessibility permission DisplayBuddy uses to intercept the keys. Open System Settings, then Privacy and Security, then Accessibility, remove DisplayBuddy from the list, then re-add it and re-grant the permission. The keys will work again immediately.
My monitor is connected through a USB-C dock and brightness keys don't reach it. What now?
Some docks and DisplayLink hubs strip DDC/CI commands before they reach the monitor. Open that monitor's settings in DisplayBuddy and switch Control Mode to Software Dimming. Software Dimming applies a software overlay that works on any display, including DisplayLink-connected screens, and the brightness keys will then control it.
Why don't my Keychron brightness keys behave like the Apple Magic Keyboard?
Keychron keyboards using QMK firmware (K3 Pro, K3 Max, and similar) emit standard keycodes rather than the Apple-specific media protocol for brightness. macOS therefore treats those keys as plain F-keys. Assign a custom shortcut in DisplayBuddy that matches the Keychron's F-keys (or any combination you prefer), and the keys will route through DisplayBuddy correctly. This also covers Logitech MX Keys and any other third-party keyboard with brightness keys. DisplayBuddy works with all of them.
DisplayBuddy
for macOS 10.13+
Take control of your monitors
Control brightness, contrast, volume, and much more.
Buy NowLifetime license • 7-day refunds no questions asked